Followers

Showing posts with label Branches. Show all posts

Monday, 8 May 2017

Never Regret! - Wordage & Beautanicals - for Bee Crafty

Hiya and Welcome to my Monday Design Team post for Bee Crafty

Oh my Word!!! It has been a crazy week here at KraftyKezzlaHQ - we have no broadband at home for 3 weeks so I am having to use my mobile as a Wifi Hotspot which I do not have too much data left so I am having to use my internet sparingly - not good for a social media geek lol

So while I can not be online as much as I would like I have been moving all the bedrooms around in my house!! which is nuts as its 4 rooms that are now all topsy turvy while I sort through and delclutter... but it also means some good news... Hubby and I are moving our bedroom to the back of the house which will then leave me free to use the front room we are now in as my Work/Office/Kraftroom like we always intended to eventually... it is going to be amazing to be able to leave all my stuff out where I like and be able to shut the door at night without having to shift ot all away each night YAY!! It is going to be mega!!

Now back to my post after all that chatting lol

This week I am sharing with you an older make from me where I have used the fabulous 'Never Regret' - WORDage Stamp as the main focal point of the card and then created a flower from the leaves of the 'Maple' stamp and the larger branch from 'Branches' stamp set both from the BEAUtanical Collection


For the flower I repeat stamped the maple leaf onto pearlescent card, fussy cut them, embossed them from the reverse and layered them up overlapping to create the bloom, the leaves I stamped using the branche stamp which I also fussy and fixed under the flower.

I teamed these lush stamps with some pink, brown, kraft and cream cardstock, some circular dies, flatback pearl and some polka dot ribbon, on a 7x7" cardblank

Thanks You so much for visiting my post today - please come back to the Bee Crafty Team Blog again soon for more yummy inspiration from the Amazing Design Team

Krafty Hugs xx

Monday, 24 April 2017

Planning with my Bee Crafty Polymer Stamps

Hiya and Welcome to my Monday Post for Bee Crafty Stamps

This week I have been getting ahead with my 'Filofax - Planning' and I have decorated this week's pages and my May monthly spread using some of my favourite Bee Crafty polymer stamps


Bee Crafty Products used:

BEAUtanicals - Branches - polymer stamp set
BEAUtanicals - Tall Elder - polymer stamp
WORDage - Dream - polymer stamp
WORDage - Beautiful Things - polymer stamp

I really love to use my non-planner crafty stash in my planners as it helps me to expand on what I have brought for my planning, but also as I love to use my planner for memory keeping as well as planning my day to day stuff

I chose colours of stamping ink to complement the mushroom coloured leather of my current planner (I have a big colletion to choose from each month) 

I decided to use the same stamps for my weekly layouts in May as I used for my Monthly spread.


I stamped using versamagic chalky ink's in the following colours

Wheat: for the script stamp
Sage: for the larger branch stamp from the set
Sahara Sand: for the Tall Elder stamp (I just used the top part)
Jumbo Java: for all the Wordage stamps

I stamped them around the edges and over the notes section to leave the main pages blank for filling in the details of my week


I used the same stamps and colours for the my Monthly spread


I really like how the colours work with my chosen planner for May

Thank You so much for visiting My Blog today I hope I have inspired you to use your Bee Crafty Stamps in more of your projects as well as your Cardmaking

Visit the Bee Crafty Team Blog to see more inspiring makes from the Brilliant Bee Crafty Design Team

Krafty Hugs xx

Monday, 17 April 2017

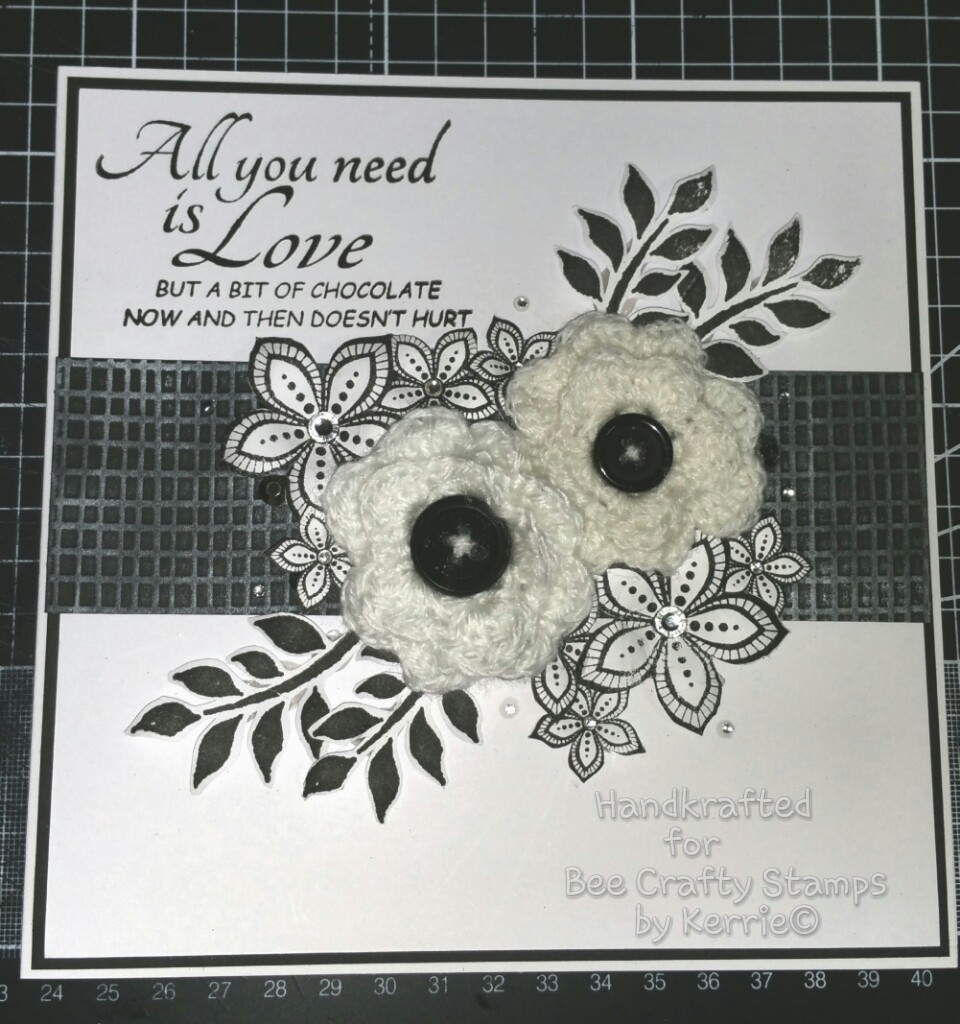
Love and Chocolate - Black & White - for Bee Crafty Stamps


Hiya and Welcome to my Monday Post for Bee Crafty Stamps

Bee Crafty Products used:

Wordage - 'All You Need is Love' - polymer stamp
Fabulous Flowers - Star Flowers - polymer stamp set
Beautanicals - Branches - polymer stamp set

I hope you are all having a lovely Easter with your families & friends - I was inspired but Easter Chocolate for this make but went with a Black & White, Classic look instead of the traditional bunnies and eggs for Easter


Firstly I crocheted some white flowers and stitched through some buttons using white yarn. Then I repeat stamped the Star Flowers and larger Branch onto white cardstock using black versafine ink. I then spent some time fussy cutting them out


I then trimmed a piece of black card to 1/2 cm smaller than my 7x7 card blank. Then I trimmed a piece of white cardstock to 1/2 cm smaller than the black piece. I ran some black card stock through my embossing machine using a burlap embossing folder and cut a strip of this to fit the width of my card. I layer the black and white card pieces onto the card blank using strong glue, I stamped the Love and Chocolate sentiment onto the top corner and mounted the black embossed strip to the card front using foam tape.


I then arranged the Branches, Crocheted Flowers and Star flowers and when i was happy with how they looked I fixed them down using my hot glue gun


I then fixed some gems using glossy accents to the flower centres, and scattered some around


I love how this project turned out as I really love non-traditional themes and colours during the seasonal occasions through the year


I made 2 more slightly altering the layout each time


Thanks You so much for visiting the Bee Crafty Blog please do visit again soon to see more Awesome Projects from the Amazing Bee Crafty Design Team, they are such a Talented Bunch 

Krafty Hugs xx
Visit Bee Crafty Stamps Blog to see more examples from the Talented Bee Crafty Design Team

Monday, 1 February 2016

Bee Craft Stamps - FASHIONette's - Tracy 'Important to be Nice'

Hiya and Welcome to my Monday Post for Bee Crafty
I jumped back into my own comfortzone for today's post with Alcohol Markers and Pretty Colours

I picked my 3 backing papers first from my stash and trimmed them down and layered them up along with Mirror Board and Pearlescent Cardstock - I love the lots of layers look
I stamped and coloured 'FASHIONette - Tracy' and coloured her using my Alcohol Markers to match the papers I chose. I stamped the swirl part from 'Yuletide - Holly Swirl' (Christmas stamps are not just for Christmas) around the edges of the image using 'Pumice Stone' Distress Ink to make into a topper. The Sentiment 'Important to be Nice' is from  'WORDage' collection, I stamped this using the same Distress Ink, layered with some dark brown card and fixed between the layers at the side of the 'Tracy' topper
I created the floral bouquets using 'Fabulous Flowers - Star Flowers' stamped using 'Pumice Stone' Distress Ink, fussy cut them out and coloured them with Alcohol markers to match the image. I also used the 'Larger Branch' from the 'BEAUtanicals - Branches' set using the same distress ink, fussy cut them out and layers these up with some diecut swirls around the Flowers
Thank You so much for visiting my Post today - please visit the Bee Crafty Blog again soon to see more Gorgeous Makes from the Talented Design Team x x
Krafty Hugs xxx

Monday, 5 October 2015

Bee Crafty - Never Regret - Maple Leaf Flower

Hiya and welcome to my Monday Post for Bee Crafty
This week I am sharing with you an elegant make using the 'Wordage - Never Regret - Large' sentiment stamp as the main topper for the card and a handmade Flower made using the 'Beautanicals - Maple Leaf Solid' stamp
I was thinking of what to make and I wanted to put a flower on the side of a sentiment and I suddenly had the idea to make the flower using the Maple Leaf stamp
I stamped the Leaf stamp 6 times using a permanant lilac ink stamp onto pearlescent cardstock, I cut them out and shaped them using a foam mat and a large ball tool, I then fixed them together using a glue gun each one was layered on top on the one below offset to create a rosette flower. I stamped the 'Beautanicals - Branches' large branch onto more pearlescent cardstock using brown permanent ink then cut those out. 
I created the cardfront using lots of layers of cardstock which I had grabbed from my offcuts box again - I am a little addicted to using my offcuts and this shows just how pretty they can look. I added some lilac textured card in to tie all the elements together. The light beige cardstock is from a stamp set packaging (too pretty to throw away) which I wrapped brown spotty ribbon round then fixed to the cardfront.
The sentiment topper I made by die-cutting a large circle die from pearlescent cardstock and stamping the sentiment into the centre, inking the edges using the lilac ink again. I fixed this to a circle cut from the lilac textured cardstock then layering this onto a diecut doily circle and fixing to the cardfront centre using foam tape.
I used a glue gun to fix the flower to the right corner above the sentiment and fixed the leafy branches using the glue gun and slipping under the flower on each side. To finish i tied the left over ribbon into a bow which I attached on top of the ribbon using the glue gun again.
Thank You so much for visiting the Bee Crafty Blog today, please come back soon to see more Gorgeous Makes from the Brilliant Design Team
Krafty Hugs xxx

Monday, 7 September 2015

DT Kerrie - Planning with my Bee Crafty Stamps

Happy Monday and welcome to my Post for Bee Crafty
Wowser its been such a busy week with my 4 kiddies starting back at school today, all the uniform sorting and finishing up projects - nice to be back to routine but I miss them all - its so quiet today - but that does mean more time to craft so its all good 
I have been using some of my Fave Bee Crafty Stamps in my Purple Planner this week, hense why my post is a bit late as I was finishing up filling in Sunday xx
I stamped them using Chalk Inks, going over some details using my coloured fine liner pens - some across the tops and bottoms of the pages and some as accents on the plan days - I love to add colour and doodles to my planner pages but stamps are by far my favourite planning tool and im always on the look out for more designs and sets to use 
I couldnt resist filling these pages up using my 3 fave colours, Teal, Pink & Purple 
I hope I have given you a few ideas for using your stamps in other crafts - decorating planners is all the rage across instagram, facebook and blogs Im addicted but I have always loved to plan&list daily 
Thank You so much for visiting today to see my post
Krafty Hugs xx

Monday, 8 June 2015

Kerrie DT - Peggy 'Dreams Come True' - Bee Crafty

Hiya and welcome to my Monday Post for Bee Crafty
Today I am sharing with you a pretty shabby chic project made with 'Peggy' from the 'Fashionette's Collection' - I've gone back to my fave style of cardmaking this week, Colouring with Alcohol Markers and lots of layers
 I stamped 'Peggy' onto super smooth cardstock using a light grey dye inkpad and coloured her using Alcohol Markers - I colour matched to the papers I chose 
The colour tones of the paperpad I chose are quite dusty and vintage looking which I really love, I couldnt resist rounding some corners using a corner punch and inking up the edges using inkpads, I also edged the two background layers using a dark brown alcohol marker. The brown layer I used the 'Circles' Inkables Template I brought from Bee Crafty recently, I embossed the cardstock using the template and an embossing machine, I then inked over the whole cardstock to being out the texture of the circles
I fixed the layers to the card front at jaunty angels. I then stamped the larger branch from the Beautanicals 'Branches' set onto textured carstock 4 times and fussy cut them to create the foliage for the Paper Flowers I've used in oposite corners of the card
The sentiment is part of the 'Dreams Come True' stamp. To stamp juat the part I wanted to, I cover the rest of the words using masking tape then inked the stamp, I removed the masking tape and stamped the sentiment onto cardstock
I have used Brown Mirror Board for the Matt&Layering and to finish I added some Glittered Dome Gems which I had coloured using the Dark Brown alcohol marker again
Thankyou for visiting today - come back soon to see more gorgeous makes by the Design Team
Krafty Hugs xx
Friday, 15 May 2015

Fashionette's 'Mary' - Bee Crafty

Hiya and welcome to my Friday Post for Bee Crafty
This week I have been back into my comfort zone of pretty & girly
I chose to colour 'Mary' she is such a pretty girl and I matched her to a pretty floral paper 


I coloured her using my fave alcohol markers in colours to compliment the theme of the paper, trimmed the image down and inked the edges using Distress Inks 'Tattered Rose' & 'Spun Sugar'


To create the foliage I stamped the larger branch from the 'Branches' set using Distress Inks 'Forest Moss' & 'Crushed Olive', I cut them out and layered them up with some paper flowers and buttons

I added lots of  layers and jaunty angles as I love them

I pinched a sticky note from my planner stash to create the tab for the sentiment which I stamped using some Wordage stamps 'With Love' and 'Hugs & Kisses'


Thank you for visiting today come back soon for more Gorgeous Projects from the Design Team 
Check out the Bee Crafty Facebook Group for lots of inspiration and fun 
Krafty Hugs xx

Friday, 1 May 2015

FASHIONettes 'Peggy' - Decision to Try - Bee Crafty

Happy Friday so its my turn to post for Bee Crafty
I ordered some new Stamps & Inkables Templates in the last 2 weeks and couldnt wait to get inky - I love the FASHIONette's so much and I've been eager to try out the templates with my Distress Inks

I stamped 'Peggy' onto watercolour cardstock (which I had trimmed to fit an 8x8 cardblank with a few mm border) using Archival Ink because I wated to use lots of water and didnt want the image to bleed. I then stamped again onto eclipse masking tape and cut her out to make a mask which I fixed over her on the watercolour cardstock.

The background I created by blending 'Antique Linen' & 'Tattered Rose' distress inks using a round blending tool. I then placed the 'Circles' inkables template over the corners and sprayed through with water, then used a 'microfibre cloth' to remove the excess water and lift the colour away from the wet areas too. this showed up quite faint though as the colours I used were a bit pale.

Next I used the 'Metalwork Alpha' inkables template around the edges using 'Victorian Velvet' distress ink. I inked the edges using 'Pumice Stone' distress ink. I sprinkled over some rock salt and sprayed with water, waited for the salt to react a bit then dried the card using a heat gun on a low setting. I brushed the salt off to reveal the speckles where it had reacted with the ink.

Next I stamped the 'Maple Outline' stamps slightly off the page and painted over them using 'Pumice Stone' distress ink. I also randomly stamped the 'Large Branch' BEAUtanicals stamp accross the top of the card and 'Dandies' Backdrop Border stamp along the bottom of the card using 'Frayed Burlap' distress ink.

I also randomly stamped the 'Cow Parsley' & 'Branches' BEAUtanicals stamps randomly using 'Tattered Rose' & 'Victorian Velvet' around the edge of the card.

I reused the 'Circles' inkables template around the corners again dry template this time using 'Antique Linen' distress ink and the round blending tool, this showed up a lot better with the paler colours.


I then removed the mask from 'Peggy' which revealed that no ink had slipped through and she was perfectly blank for me to add colour to. I used Distress Inks as watercolours using a blending mat and a waterbrush. The colours I used were all the same ones from the background.

I matted the finished picture onto dark brown mirror board and attached to my 8x8 cardbalnk using foam tape.

 
Lastly I stamped the 'Decision to Try' WORDage stamp onto an offcut of watercolour card using the 'Pumpice Stone' ink, I then trimmed the words out and matted them onto dark brown mirror board, I then fixed them to the finished card using foam tape for dimension.
Thank you for visiting today, dont forget to check back soon for more gorgeous makes by the Brilliant Design Team and stop by the 'Bee Crafty Facebook Group' to join in the fun
Krafty Hugs xx

Friday, 3 April 2015

I'm Glad I Did It - TinMan - Bee Crafty

Hiya and welcome to my Friday DT post for Bee Crafty
I have made a TinMan from the Wizard of Oz Collection card using Distress Inks and a mask

To create the background I tapped some ink from Stormy Sky distress inkpad onto a craft sheet then using water and a paint brush I used the ink as a watercolour across a piece of watercolour card.
Using an inking tool and Weathered Wood distress inkpad Ive inked the edges and in from the corners, more on the top left. Using a mask I sprayed water through it, this dilutes the ink just where the water hits through the mask. I added some salt which then moves the watery ink and creates a bit more texture look. I heated the card using a heat tool and then brushed the salt away. I cleaned the mask and then inked through it randomly using Weathered wood.


I stamped the TinMan using a grey inkpad, then coloured him using Weathered Wood distress ink and a waterbrush. Once dry I went over the shaded areas again with Weathered Wood to darken the colour.


Ive added embossed details in the Corners using clear embossing ink with white embossing ink and some more lush Bee Crafty stamps.... Yuletide - Holly Swirl, Beautanicals - Branches and Cow Parsley

I stamped WORDage - Glad I Did It using a grey inkpad in the area that the TinMan is looking so it looks like he is thinking the phrase
I hope you like my project today and that you will visit again soon to see some more gorgeous makes by the Bee Crafty Design Team
Krafty Hugs xx

Friday, 27 March 2015

Dreams Come True - Bee Crafty DT Make

Hiya and welcome to my Friday post for Bee Crafty which is now my weekly posting day on the
Bee Crafty Blog
This week I got inky and messy with a load of my fave Bee Crafty stamps along with distress inks and embossing powder it was a lot of fun


The Bee Crafty stamps I have used are...
I trimmed a piece of gold Mirror Board to a few mm smaller than my 8x8 cardblank - I measure up against the card and make with a pencil at the length and width I like by eye then trim using a guilotine. I then did the same using a piece of patterned cardstock. I embossed the cardstock using a Burlap embossing folder and my die-cutting machine. Inked the edges of the cardstock using 'Frayed Burlap' Distress Ink and a mini round inking tool I also edged the cardstock with a dark brown alcohol marker
I fixed the gold Mirror Board to the cardblank using a strong glue and then fixed the embossed panel onto the card front using narrow foam tape

Next I trimmed a piece of watecolour card to about a cm smaller than the embossed panel all the way around then chose my inks and stamps to use
I stamped the 'Bubble Wrap' stamp using versamark ink, tipped clear embossing powder over, tapped off excess then heated with a heat gun leaving a glossy image on the card. I randomly stamped the 'Script', 'Maple' leaves 'Cow Parsley' and 'Branches' stamps around the edges and working in towards the centre with distress inks 'Tattered Rose', 'Victorian Velvet', 'Frayed Burlap' and 'Pumice Stone' - I wiped over the bubble wrap areas to reveal the uninked embossed areas. I inked the edges using 'Tattered Rose' and 'Frayed Burlap' inks I edged the card using a dark brown alcohol marker to match the other layer. Once dry I fixed the watercolour card panel to the card front

I was going to use one of the Fashionista's but after seeing how the background came out I thought it would be a shame to cover most of it - so I opted for a lovely sentiment instead I stamped the sentiment using brown ink and then using the Branches, Cow Parsley and Script stamps and similar random stamping as the background piece, inked edges and the matted onto gold Mirror Board. I fixed this topper I created to the cardfront using narrow foam tape

I really like how this one turned out and was a nice boost to my mucking crafting Mojo

Thank You so much for visiting the my blog today 

Krafty Hugs xx

TCBOTB Background

Related Posts Plugin for WordPress, Blogger...