Followers

Saturday 31 January 2015

Smile! - Sketch Saturday


Hiya and welocme to my Blog so sorry its late in the day Ive been offline all day and didnt realise it hadnt gone live

This is my last post as Guest Designer for Sketch Saturday - its been a lot of fun - thank you to Vannessa for inviting me

Today a new Challenge started over at Sketch Saturday its a pick your Fave Sketch Challenge so you get to look through previous sketches and pick which one to use... all the details can be found over on the Sketch Saturday Blog

This week the Challenge is sponsered by 'Drawn with Character'

I chose to use Sketch #323
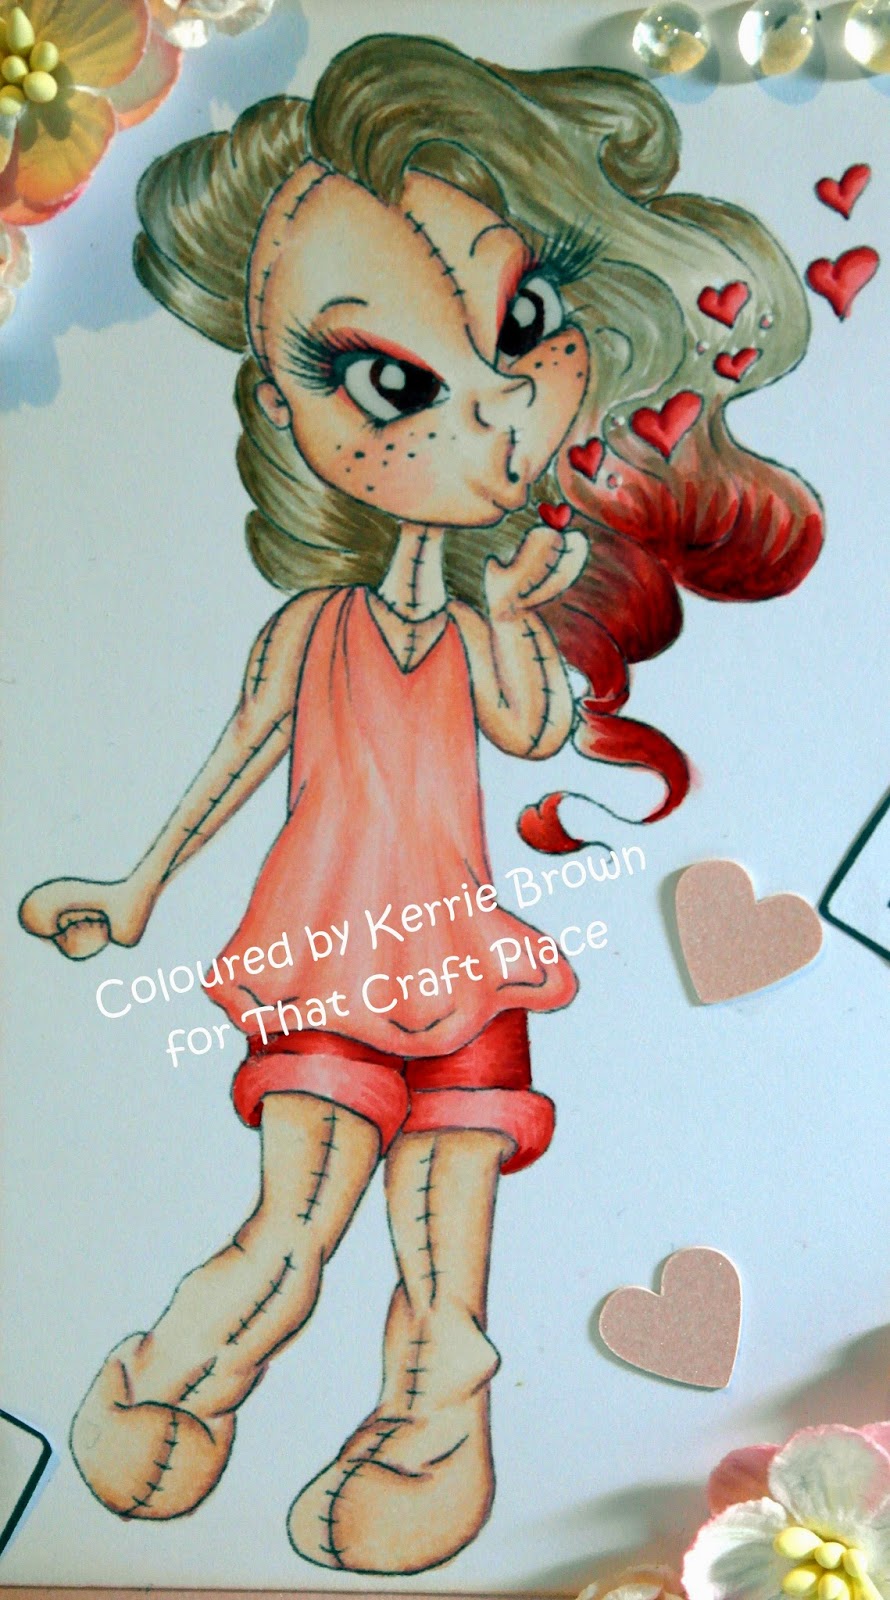
and Image 'Holy Shirt' from Slinky<3Tart - I coloured her using Copic Markers


Hair: E37, E35, E31
Skin: E04, E11, E21, E00, E000
Eyeshadow: RV11
Lips: RV11, RV21, RV10
Tshirt & Eyes: YG63, YG61

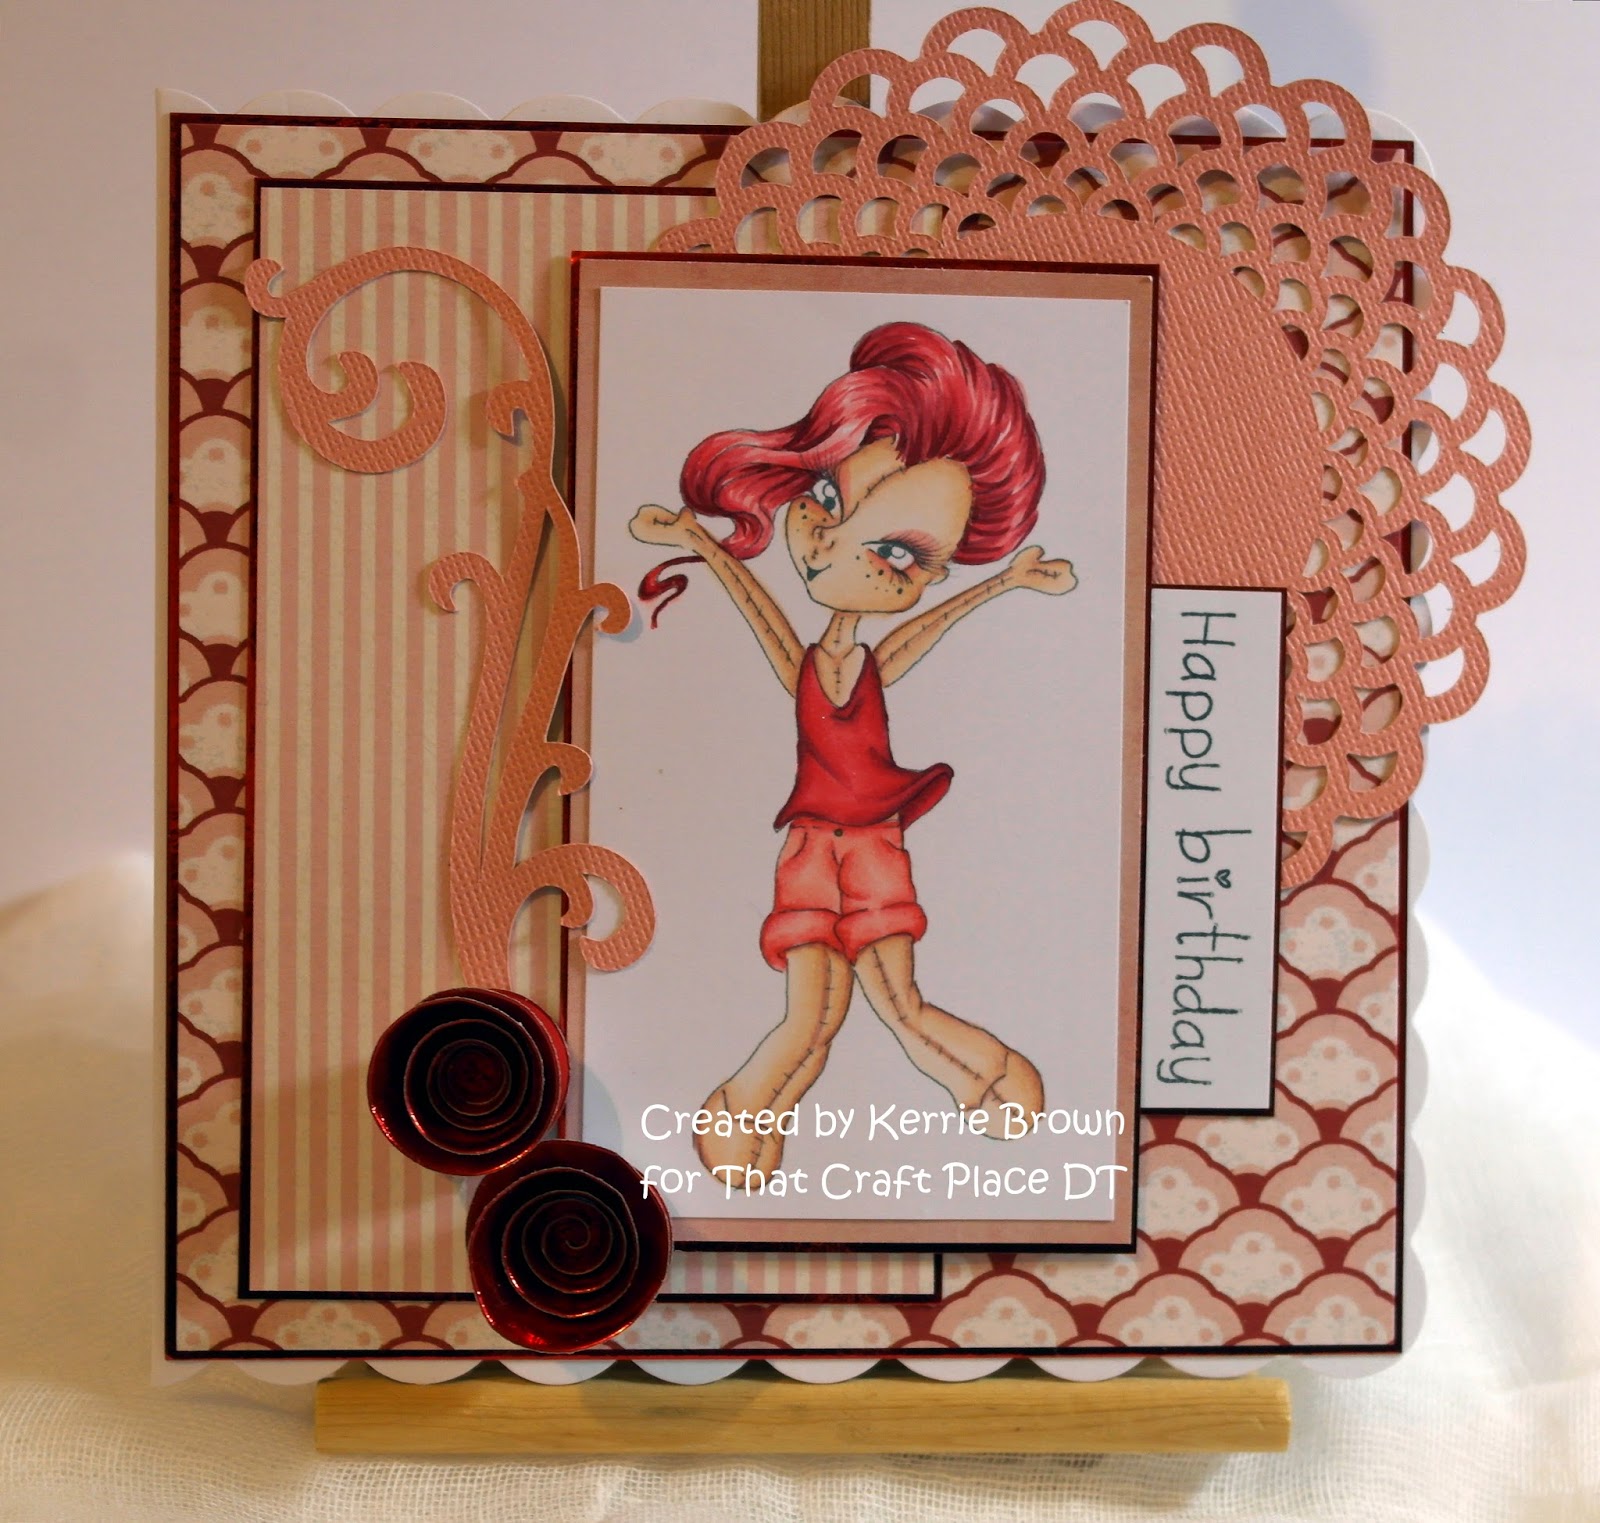
I chose this sketch as I thought the square remineded me of a polaroid photo so i used my Cameo to cut a polaroid shape


I trimmed the coloured image so that it fitted behind the polaroid shape and matted them both onto golden brown mirror board.
I trimmed a piece of stripey patterned paper to 1/8inch smaller than the 6x6 scalloped cardblank. I used a scallop lace edge border punch along the bottom edge of the paper and then matted onto golden brown mirror board. 
I wrapped a pale pink ribbon around the patterned paper panel and fixed to the card front using 1mm deep foam tape.
I fixed the polaroid to the card front at a jaunty angle using foam tape. I printed the 'Smile!' sentiment using Docrafts Digital Designer, cut it out using a small circle die, matted with mirror board and fixed behind the polaroid shape.
I used some paper flowers from Wild Orchid Crafts and some flat back pearls to finish the card

I hope you will take part in the Sketch Saturday Challenge and will visit my Blog again soon - please follow if you havent already

Krafty Hugs
Kerrie xx
January GDT Sketch Saturday


Tuesday 27 January 2015

'Being Happy' - Clean & Simple - for Bee Crafty Stamps

Hiya and welcome to my Tuesday post for Bee Crafty Stamps

I am still sticking to part of my New Year's Resolutions of using up my existing stash and offcuts - this card has used a piece of Black Glossy cardstock from my A4 card stah box, a large offcut of white pearlescent cardstock (left from a box I made) and one of my favourite embossing folders

This week I have chosen to use one of favourite sentiment stamps from the Bee Crafty Shop


I love this sentiment and wanted to show it off in a Clean & Simple way I dont do simple often but sometimes I like to push out of my comfort zone


I have chosen a 7x7inch cardblank and turned it on its side so it opens as a tent fold. I trimmed a piece of pearlescent white cardstock to 1/8inch smaller than the cardblank by laying it over and marking with a pencil before trimming with a guilotine. I then lined up a plain circle die to the centre taped in place with some low tack masking tape and run through my die-cutting machine. For texture I then chose a simple design embossing folder, lined up the design in the corners of the die cut panel and run through my machine using the plate order for embossing folders. 

I stamped the sentiment onto an offcut of plain white cardstock smaller than the cut and embossed panel. I used a wet glue on the back of the cut&embossed panel just around the die-cut aperture hole and then looking through the hole i lined it up over the centre of the sentiment then pressed down.
To created the fancy circle border I used a fancy circular die cut from black cardstock then lined up the plain circle die to the centre and taped with low tack masking tape, I ran this through my machine and when it was cut there was a tiny border left and the fancy circular pattern. I stuck this to the circle aperture using tacky glue being careful to line it up with the edge that was already cut. 

I wrapped a black and white zigzag patterned ribbon around this panel and attached at the back with high tack tape. The bow i made using the offcut (last of the roll so i need to go shopping) which I doubled over at the back and wrapped a small piece around to create a neat bow.

I trimmed a black piece of cardstock to leave a small border around the panel which i fixed to the black cardstock using 1 mm foam tape for a bit of depth.

I added a dazzler embellishment in each corner to finish the card.

I hope you like my card today and will visit the Blog again soon for more projects by the Bee Crafty Team 

Krafty Hugs

Saturday 24 January 2015

Kn(owl)edge - Slinky Tart - for Sketch Saturday

 
Hiya and welcome to my Blog

Today I am showing you a card I made for Sketch Saturday Challenge Blog as Guest Designer

I hope you will visit the BLOG to see the Design Team makes and to see what they all created using the following the sketch below...


The Image I have used is called 'Kn(owl)edge' by SlinkyTart 


I coloured her using Copic Markers:

Hair: E49, E44, E43, 
Skin: E04, E11, E21, E00, E000 Blush: R20
Eyeshadow: C5, C3, C1
Eyes: B39, B37
Lips: E09, E04, R02
Tshirt, Glasses & Diamonds: RV29, R22, R20
Tank Top: B39, B37, N5


Recipe:

8x8 Cardblank (from The Range)
Navy Stripe & Floral Papers - 24.5 x 24.5cm Paper Pad (from Creataonline)
Centura Pearl Cardstock die-cut using Circular Doily Die (from JoyCrafts)
Coloured Image topper cut from - Circle Die from Xcut
Topper edges inked using Spun Sugar Distress Ink
Stretch gift wrap cord wrapped around the Card
Best Wishes sentiment stamp from my Stash
Silver Mirror Board for all Matting
Paper Roses from Wild Orchid Crafts
Pink Gems from my Stash

See you again soon

Hugs
Sketch Saturday GDT-Jan2015

Tuesday 20 January 2015

FASHIONette Vera - Inky but Pretty

Hiya today I posted my DT make over on Bee Crafty Stamps Blog and I wanted to share here too

Come on over and join the Bee Crafty Facebook Group HERE!

I made myself a promise this New Year that I would make use of as much of my crafty stash as I could without spending too much on New - well I've still been tempted with a few new things like magazines and a new case for my Copic Markers but I have also got out some old favourite things like Versamark and Clear Embossing Powder 
I stamped FASHIONette's 'Vera' using Archival Ink and then made a mask of her using Eclipse Tape (another oldie but goodie) I covered the stamped image using the mask and then rough stamped the 'Backdrop - Bubble Wrap Positive' stamp over, I removed the mask which left her uninked. I then coloured her using my Spectrum Noir Pencils
Hair: 099, 096, 095, 091
Skin: 007, 005, 004, 034
Dress: 026, 031, 034
Spots & Sash: 047, 058, 056
Shoes & Earrings: 117
The Background Paper I created using BEAUtanicals 'Cow Parsley' & 'Branches' stamps with Versamark and Clear Embossing powder which I heated with a heat gun to create a resist, I then inked over using Distress Inks (Spun Sugar, Victorian Velvet, Shabby Shutters & Tea Dye) but the stamped areas stayed white and raised. I then stamped a smaller stamp around using distress ink to add a different texture


I also stamped the larger leaf stamp onto cardstock and cut out to created the leaves for my floral embellishment.

Paper Flowers and Golden Brown Mirror Board are from my own stash
I hope you like the softer artsy look I created this week and I do hope you will visit the blog again soon there are different posts each day from different team members
Krafty Hugs

Sunday 18 January 2015

'Love From Sugar' - That Craft Place Challenge


 Hiya and welcome to my Blog

Today we have a New Challenge starting over at That Craft Place Challege Blog and the theme is 'Love/Valentine'- check it out great prize for the Winner

Naturally I chose 'Love From Sugar' for my project I just love her so much she's so cute - the scrabble sentiment is from That Craft Place Etsy too


Here is my Project but in true OCD Kerrie fashion I was not happy with her hair and it bothered me all night so I got up first thing and altered it a bit


I coloured Sugar using Copic Markers

Markers:

Hair: E43, E41, E40, R27, R24, R22, R20 (dip-dyed look)
Skin: E04, E11, E21, E00, E000 Blush: R20
Eyes: E18 (added Glossy Accents)
Makeup: R24, R22, R20
Dress: R22, R20, R02, YR000
Shorts: R29, R24, R22, R20


Recipe:

7x7 Cardblank - That Craft Place
Salmon Pink Silky Cardstock - my own stash
Papers - Sidewalks 'October Afternoon' - That Craft Place
Tim Holtz Distress Ink 'Spun Sugar' - inked all edges using small round blending tool
Note Paper & Heart Doily - using my Cameo - Sihouette Machines available from That Craft Place
Scattered Hearts - waste from the Heart Doily (I couldnt throw them away)
Scrabble Sentiment - That Craft Place Etsy
Dew Drops & Paper Flowers - my own stash

Please do visit That Craft Place Blog and check out the Design Team makes they are all so so Beautiful

I am entering this Project into the following Challenges:

 My Time to Craft - Love is All Around

Krafty Hugs
Kerrie xx
That Craft Place DT

Saturday 17 January 2015

Saturday Sketch - 'With Love'


Hiya and welcome to my Blog

Today a New Sketch Saturday Challenge begins over on the Challenge Blog and we are being sponsored by.... Bunny Zoe's Crafts and the prize is £10 to spend on their Shop

Go on over and check out the gorgeous Blog and see the Stunning Creations by the Amazing Design Team that I have the honour of being Guest Designer for through January - do please join in the fun all you need to do is follow the Sketch

Here is the Sketch we have for this week...
I coloured my chosen Image using Copic Markers

Copic Markers:

Hair: E37, R35, R31
Skin: E11, E02, E00, E51 Blush: R02
Lips: E04, R02
Eye Makeup & Hair Tie: C3, C1
Shirt: R37, R35, R32, R22, R20, N3

Recipe:

A5 Cardblank, scored and folded from A4 Centura Pearl cardstock - Crafters Companion
All Matting, golden brown Mirror Board - Joycrafts
Background - salmon pink Silky Cardstock - Joycrafts
Embossing - A4 Embossing folder - 'Sue Wilson' Creative Expressions
Floral Layer cut from an Offcut from my fave cardstock pad - Joycrafts
Oval topper and Border cut from Oval Floral Die - Joycrafts
Sentiment Stamp - Bee Crafty Stamps
Paper Cherry Blossoms & Paper Roses - Wild Orchid Crafts
Paper Rose Wires trimmed from the flower using wire cutters and spiralled around a pokey tool
Flat Backed Pearls from my own stash - were white but coloured using R35 Copic Marker

Thank you for visiting my Blog today and I hope you will visit again soon

I am entering this card in the following challenge:

Sassy Studio Designs - It's My Thang' (fave colour combo)

Krafty Hugs
Kerrie xx
Saturday Sketch GDT

Friday 16 January 2015

Crafting Musketeers - Midway Challenge Reminder - DT Make

Hiya today its the Challenge Midway reminder over at Crafting Musketeer's 

The theme of the Challenge is 'Hats/Valentines' - and our sponsor for this challenge is Lacy Sunshine the prize from her is very genorous head on over to the Crafting Musketeer's Blog to see all the details

Here is my make for the Challenge using... 'Patchy Penny Snowflake' from Lacy Sunshine


I have created a 'Winter Birthday' card for the challenge - I chose my papers first and then coloured the image to match the colours in the papers

I used Copic Markers:

Hat: RV25, RV21, RV10
Hair: E49, E43, E41 Bows: RV25, RV21
Skin: E11, E02, E00, E51, E50 Blush: R20
Eyes & Snowflakes: YG06, YG03
Coat: G28, G17, G16
Skirt: RV25, RV21, R20
Dress Patches: YG06, YG03, RV25, RV21, RV10, R20

Card Recipe:

Studio Light Backing Papers 
Joycrafts Silky Cardstock
Joycrafts Circular Die
Joycrafts Snowflake Die
Xcut Snowflake Die (free on Docrafts magazine)
Craftwell Embossing Folder (free with eBosser)
Tim Holtz distress ink Spun Sugar
Tim Holtz mini ink blending tool 
Pink Gems (from my stash)
Sentiment typed and printed from laptop

I hope you will join in the challenge and I hope to see you here again soon

I am entering this card into the following Challenge:

Love to Create Challenge Blog - Add Snowflakes

Krafty Hugs
Kerrie xx
Crafting Musketeer's DT

Tuesday 13 January 2015

Bee Crafty Tuesday - BEAUtanicals Dandelion With Love

Hiya and welcome to my Tuesday blogpost for Bee Crafty Stamps today I ams sharing with you 2 makes using a stamping techniques I havent used in a while Bleaching & Lemon Juice and the lovely BEAUtanicals Dandelion and Wordage Minis - With Love


For this first one I used watercolour card trimmed to fit a 6x6 cardblank, I used Tim Holtz Distress Inks  and a blending tool to randomly colour the watercolour card. I then used the Da Vinci Script stamp with some bleach to stamp over the background - this removes the colour of the ink and gives a nice effect. I matted this background panel uaing black mirror board and fixed to the card front. I stamped the Dandelion stamp onto stamping cardstock using black inkpad and randomly inked the edges using the distress inks again. I matted this topper onto black mirror board and attached to the card front using foam tape at a jaunty angle. The sentiment was stamped, inked and matted in the same way and fixed to the cardfront with foam pads. I used an off cut of black mirror for the strip down the side and 2 dazzle flat backs to finish off the card.


For my second make I wanted to show a way of using the stamps to create a vintage effect.
I cut a nice sized bookmark from watercolour card. I tipped a few drops of lemon juice onto my non-stick craft mat and dipped a piece of cut & dry foam into it and sponged onto the Dandelion stamp and pressed this onto the watercolour card. I then did the same using the With Love sentiment and stamped it underneath the dandelion. Using the damp cut&dry foam I dragged it around the edge of the bookmark. I then heated the bookmark using my heat tool to heat the lemon juice as it burns it turns brown. I love this effect. I then matted the bookmark onto gold mirror board. made a hole using a hole punch, added an eyelet and threaded some ribbon through. 

Thank you so much for visiting my post today and I do hope you will visit again soon

Krafty Hugs 

Saturday 10 January 2015

Sketch Saturday - Barn Brat

Hiya and welcome to my Blog - so sorry this post is late - Blogger did not play nice and scheduler didnt work - I was out and hadnt realised 


Today there is a New Sketch Challenge over at Sketch Saturday Blog and this time we are sponsered by Simon Says Stamp I'm Guest Designer for January so here is my make following the Sketch for this week- please do visit the Challenge Blog as the prise is an amazing $25 to spend in their store


I picked a really cool Image by 'Slinky<3Tart' called 'Barn Brat' as soon as I saw the star in the sketch I thought of this Image and the Sentiment which I typed using 'Docrafts Digital Designer'


I have coloured her using Copic Markers

Hat: E37, E35, E31 - Star: C2, C0
Hair: R59, R39, R37, R35
Skin: E11, E21, E51, E50 Blush R02
Lips: E04. R02 - Straw: E35, E31
Eyeshadow: C4
Eyes: B45, B41
Shirt: C6, C4, C2, C0
Shorts: B39, B37, B45, B41
Belt: E37, E35
Barrel: E44, E43 - Metal: C4, C2, C6
Horsehead: E33, E31 - Nose E41, E40 - Ears: R02, YR000
Horse Tail & Mane: E49, E29, E37

Wow that was a lot of pens - I use a lot of random blends as I still only have 167 Copic Sketch Markers out of the 358 Sketch that are available so I have to be a bit creative at times but I do love to experiment and see if I can fins new blends from the pens I have - my poor neglected promarkers have barely been used this past year

I followed the sketch pretty much exact again except the edition of a sentiment and a character but you can see the sketch behind them

I used Coredinations cardstock for the background the red piece i left unembossed but I roughened it up with a nail file to show a bit of the core colour through. The blue piece I ran through an embossing machine using a dotty embossing folder then filed over the top to reveal the core colour on only the dots. I fixed both pieces to a blank piece of cardstock to hold them together so I could wrap the silver ribbon around them - I used a penny to draw around to make the invert corner rounding and cut with a sharp pair of scissors. I then matted this panel I created onto silver mirror board and then fixed to an A5 cardblank. I cut the Star using a basic die from silver mirror board. The sentiment I typed using my Docrafts Digital Designer program (that I use often for this on my laptop) I trimmed this using a guilotine and matted onto a scrap of silver mirror board.

I hope you like my card and will visit again soon

Hugs Kerrie xx
Guest Designer for Sketch Saturday

Tuesday 6 January 2015

Eeeeeks Good News - Secret #1 Revealed xx

Hiya and welcome to my Blog

Today I get to reveal one of my New Year Secrets - I was asked to join the Design Team over at ......


Bee Crafty Stamps my first Design Team post is live now over on the Bee Crafty Stamps BLOG 

Here is another sneaky peek at my project....


Please visit the Bee Crafty Stamps BLOG to see the full project 

Im so chuffed to join this Team as I love Bev and her Stamps which you may have seen me using over the last few months and I showed pics of my purchases from recent Craft Shows over on my Facebook as my collection was growing - I still need loads more though so I'm off to shop there this morning 

Thank you for visiting today and I hope to see you again soon

Krafty Hugs

Monday 5 January 2015

Sugar & Spice and Betty Boots New Release - TCP

Over at That Craft Place Etsy Store there has been a set of New Images Released over the last 2 days and they are really really gorgeous some are Sugar & Spice and the others are Betty Boots 

I have had the priviledge of working with them for my Design Team work

Here is my Betty Boots example

Recipe

Coloured using Copic Markers (That Craft Place)
My Minds Eye 'Lost & Found 3 - Ruby' papers (That Craft Place)
Flowers and Doily cut using Cameo (Cameo available at That Craft Place)
Cog Dies by Xcut (That Craft Place)
6x6 Cardblank
Red & Black Mirror Board
Senitment by That Craft Place Etsy
Black Soot - Distress Ink (That Craft Place)


Close up of Coloured Image
------------

Here is my Sugar & Spice example

Recipe

Coloured using Copic Markers (That Craft Place)
Cheery Lynn Flourish Die (That Craft Place) split and tucked in around topper
Joy Crafts Circular Die
Xcut Nesting Circles Die (That Craft Place)
Bunting Dies (That Craft Place
Sentiment (That Craft Place Etsy)
Paper Flowers
Metallic Green Mirror Board


Close up of coloured Image

I hope you have liked seeing both of my cards which are so different to each other - I have such a mixed taste in cardmaking styles and I love images that are unique and fun

Don't forget to visit the That Craft Place Natter Chatter Group on Facebook to see more of the Design Teams makes using the gorgeous New Releases - there are more than the 2 Ive shown you here xx

I also wanted to say that I havent taken any colouring courses I just love to sit and colour in however way i feel and where I did study Art&Design all the rules in colouring for crafts are pretty much the same just different mediums which makes it more fun - Ive been using alcohol markers for about 2 years now and I really love them but my faves are Copic as they are so yummy to colour with the brush nibs are amazing 

Hope to see you again soon 

Krafty Hugs
Kerrie xx
That Craft Place DT

Sunday 4 January 2015

Monochrome Challenge - That Craft Place Blog


Hiya and welcome to my Blog

Today we have a New Challenge over at That Craft Place Challenge Blog and the theme is Monochrome - the Design Team have all been working hard to show off different colours of Monochromatic Cards - Monochromatic is many shades of one colour and white

I chose to use many shades of Rose for my Design Team make

I picked this pretty 'Sugar & Spice' digi image to colour up - her name is 'Sugar Jump' and you can get yours over at the That Craft Place Etsy Shop

I coloured her using Copic Markers

Hair: R59, R39, R37, R35, R32
Skin: E04, E11, E21, E00, E000
Makeup: R22, R20
Vest: R59, R39, R37, R35
Shorts: R27, R24, R22, R20

Recipe

6x6 Scalloped Cardblank
My Minds Eye papers 'Lost & Found 3 - Ruby'
Mirror Board 'Ruby Red' from my own stash
Flourish & Doily cut using my Cameo machine
Cordinations cardstock in Rose
'Pinwheel Posie' die from Memory Box - rolled using a quilling tool

you can buy these papers, Die, Cameo and cardstock from That Craft Place either in store or on Facebook

Dont forget to visit the Challenge Blog to see the Design Team makes and to enter your card 

Head on over to the That Craft Place Facebook Group to buy yummy stash and join the Chat Group too to share your That Craft Place makes and to see makes by the Design Team too 

I hope you will visit my Blog again soon

Krafty Hugs
Kerrie xx
That Craft Place DT

Saturday 3 January 2015

Baby Processing - Sketch Saturday - Guest Designer


Hiya and welcome to my Blog - sorry i've been away for quite a while I was ill all over Christmas Week, My Birthday and New Year too but I have finally started to feel a bit more Human so I ventured into my Kraft Korner yesterday to make this card for my Guest Designer position I was invited to by my friend Vannessa xx

Today begins a New Sketch Challenge over at 'Sketch Saturday Blog' and I'm honoured to have been asked to be Guest Designer for January

The Challenge this week is sponsored by Bugaboo Stamps and the prize is an amazing 7 Digi's of the winners choice Wowser!! Hop on over to the Blog to see the amazing work by the Gorgeous Staurday Girls Design Team xx

Here is the Sketch we followed this week

The Image I chose to use for this Challenge is from the New Slinky<3Tart brand by Tamara who was The Stamping Chef priviously I love this Image so much fun for expecting Mum's - (You can buy these Gorgeous Digi's from the new Slinky<3Tart Facebook Group - if you are not a member yet please make sure we are Friends on Facebook then I can add you to the group as its a Secret Group for now xx)


I have coloured her using Copic Markers - It was so nice to get my Markers back out after being unable to colour while I was ill, amazing how much I missed them - all you girls/guys who colour will totally understand 


I chose these papers from First Edition 'Desert Bloom' mainly as I have never used the pad before and also because I like the colour tones I then picked out a few colours from the dotty background to colour the Image, even her skin tone matched in with the papers.

I followed the Sketch pretty much exactly as shown as I am a bit of a stickler for that.

The white of the cardstock I printed her on was very white against the colours of the papers so I tones it down using an archival ink pad from my Whispers Ink case

I hope you will visit again soon as I have made myself a challenge to Blog more often this year

Krafty Hugs
Kerrie xx
Saturday Sketch GDT


TCBOTB Background

Related Posts Plugin for WordPress, Blogger...