Hiya and Welcome to my Monday Design Team post for Bee Crafty
Oh my Word!!! It has been a crazy week here at KraftyKezzlaHQ - we have no broadband at home for 3 weeks so I am having to use my mobile as a Wifi Hotspot which I do not have too much data left so I am having to use my internet sparingly - not good for a social media geek lol
So while I can not be online as much as I would like I have been moving all the bedrooms around in my house!! which is nuts as its 4 rooms that are now all topsy turvy while I sort through and delclutter... but it also means some good news... Hubby and I are moving our bedroom to the back of the house which will then leave me free to use the front room we are now in as my Work/Office/Kraftroom like we always intended to eventually... it is going to be amazing to be able to leave all my stuff out where I like and be able to shut the door at night without having to shift ot all away each night YAY!! It is going to be mega!!
Now back to my post after all that chatting lol
This week I am sharing with you an older make from me where I have used the fabulous 'Never Regret' - WORDage Stamp as the main focal point of the card and then created a flower from the leaves of the 'Maple' stamp and the larger branch from 'Branches' stamp set both from the BEAUtanical Collection
For the flower I repeat stamped the maple leaf onto pearlescent card, fussy cut them, embossed them from the reverse and layered them up overlapping to create the bloom, the leaves I stamped using the branche stamp which I also fussy and fixed under the flower.
I teamed these lush stamps with some pink, brown, kraft and cream cardstock, some circular dies, flatback pearl and some polka dot ribbon, on a 7x7" cardblank
Thanks You so much for visiting my post today - please come back to the Bee Crafty Team Blog again soon for more yummy inspiration from the Amazing Design Team
Krafty Hugs xx
Showing posts with label BEAUtanicals. Show all posts
Monday, 8 May 2017
Monday, 24 April 2017
Planning with my Bee Crafty Polymer Stamps
Hiya and Welcome to my Monday Post for Bee Crafty Stamps
This week I have been getting ahead with my 'Filofax - Planning' and I have decorated this week's pages and my May monthly spread using some of my favourite Bee Crafty polymer stamps
Bee Crafty Products used:
BEAUtanicals - Branches - polymer stamp set
BEAUtanicals - Tall Elder - polymer stamp
WORDage - Dream - polymer stamp
WORDage - Beautiful Things - polymer stamp
Inspired by Da Vinci - Script - polymer stamp
I really love to use my non-planner crafty stash in my planners as it helps me to expand on what I have brought for my planning, but also as I love to use my planner for memory keeping as well as planning my day to day stuff
I chose colours of stamping ink to complement the mushroom coloured leather of my current planner (I have a big colletion to choose from each month)
I decided to use the same stamps for my weekly layouts in May as I used for my Monthly spread.
I stamped using versamagic chalky ink's in the following colours
Wheat: for the script stamp
Sage: for the larger branch stamp from the set
Sahara Sand: for the Tall Elder stamp (I just used the top part)
Jumbo Java: for all the Wordage stamps
I stamped them around the edges and over the notes section to leave the main pages blank for filling in the details of my week
I used the same stamps and colours for the my Monthly spread
I really like how the colours work with my chosen planner for May
Thank You so much for visiting My Blog today I hope I have inspired you to use your Bee Crafty Stamps in more of your projects as well as your Cardmaking
Visit the Bee Crafty Team Blog to see more inspiring makes from the Brilliant Bee Crafty Design Team
Krafty Hugs xx
Monday, 17 April 2017
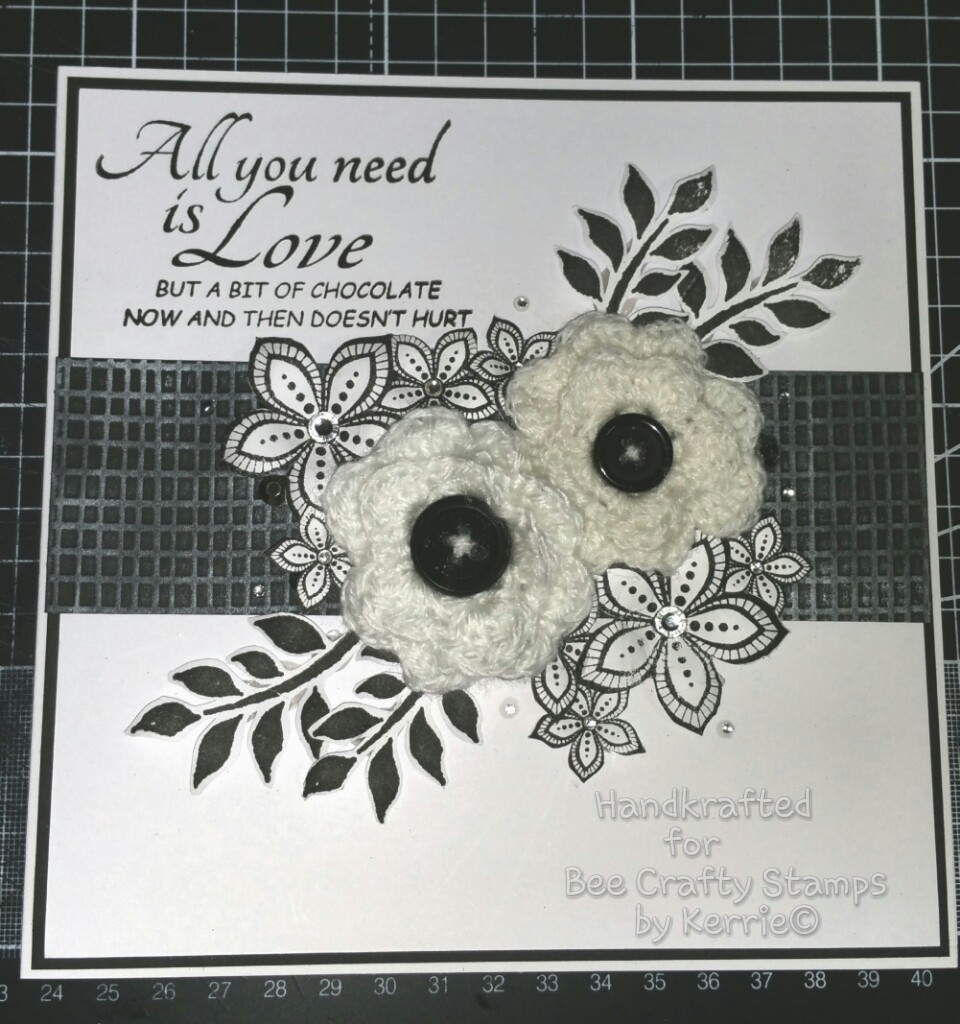
Love and Chocolate - Black & White - for Bee Crafty Stamps
Hiya and Welcome to my Monday Post for Bee Crafty Stamps
Bee Crafty Products used:
Wordage - 'All You Need is Love' - polymer stamp
Fabulous Flowers - Star Flowers - polymer stamp set
Beautanicals - Branches - polymer stamp set
Bee Crafty Products used:
Wordage - 'All You Need is Love' - polymer stamp
Fabulous Flowers - Star Flowers - polymer stamp set
Beautanicals - Branches - polymer stamp set
I hope you are all having a lovely Easter with your families & friends - I was inspired but Easter Chocolate for this make but went with a Black & White, Classic look instead of the traditional bunnies and eggs for Easter
Firstly I crocheted some white flowers and stitched through some buttons using white yarn. Then I repeat stamped the Star Flowers and larger Branch onto white cardstock using black versafine ink. I then spent some time fussy cutting them out
I then trimmed a piece of black card to 1/2 cm smaller than my 7x7 card blank. Then I trimmed a piece of white cardstock to 1/2 cm smaller than the black piece. I ran some black card stock through my embossing machine using a burlap embossing folder and cut a strip of this to fit the width of my card. I layer the black and white card pieces onto the card blank using strong glue, I stamped the Love and Chocolate sentiment onto the top corner and mounted the black embossed strip to the card front using foam tape.
I then arranged the Branches, Crocheted Flowers and Star flowers and when i was happy with how they looked I fixed them down using my hot glue gun
I then fixed some gems using glossy accents to the flower centres, and scattered some around
I love how this project turned out as I really love non-traditional themes and colours during the seasonal occasions through the year
I made 2 more slightly altering the layout each time
Thanks You so much for visiting the Bee Crafty Blog please do visit again soon to see more Awesome Projects from the Amazing Bee Crafty Design Team, they are such a Talented Bunch
Krafty Hugs xx
Visit Bee Crafty Stamps Blog to see more examples from the Talented Bee Crafty Design Team
Labels:
All You Need is Love,
BEAUtanicals,
Bee Crafty Stamps,
Black & White,
Branches,
Burlap,
Crochet Flower,
Design Team,
Embossing Folder,
Fabulous Flowers,
Inspiration,
Star Flowers,
WORDage
Monday, 10 April 2017
Simplicity - Beautanicals - Black & White - for Bee Crafty Stamps
Hiya and Welcome to my Monday Post for Bee Crafty Stamps
Today I wanted to share with you a make that is a Simplistic make from black and white cardstock
I love the Black & White look its simple but dramatic as well
Bee Crafty products used:
BEAUtanicals - Tall Elder - polymer stamp
WORDage - Simplicity is Sophistication - polymer stamp
Inkables - Oval Lace - Template
First I stamped the Tall Elder stamp onto a piece of Linen Card using Versafine Ink, I then trimmed this piece about 1cm around the edge of the image. I stamped the Simplicity is Sophistication stamp onto an off cut of white card. I matted both these pieces using black card.
I then took a piece of pearlescent white card and trimmed to 5mm smaller than a 6x6 card blank, I ran this card through my embossing machine using the Oval Lace template underneath it to create a raised pattern on the card
In this picture you can see the pretty shine from the pearlescent card and the pattern from the template shows well too
I matted the pearlescent backing I created with some black cardstock and stuck to the front of the card blank using a strong glue. I layered up the Tall Elder image and the sentiment using some foam tape. I finished the card with some jet black flat backed gems.
Thank You so much for visiting My Blog today... come back soon to see more of my Projects
Krafty Hugs xx
to see more Design Team Projects from the Bee Crafty Design Team... follow the link below
Monday, 4 July 2016
BEAUtanicals 'Oak' - 'Life & Rain' - for Bee Crafty Stamps
Hiya and Welcome to my Monday Post for Bee Crafty
Over the Weekend I have been getting inky with my Bee Crafty stamps, I have been using some of the New Leaf Sets from the BEAUtanicals Collection
These Leaves are really lovely to stamp and colour in using my Alcohol Markers - I coloured some Leaves and fussy cut out using sharp scissors to use them as embellishments on my projects
I shared a make using these Maple leaves into the Bee Crafty Stamps Facebook Group over the Weekend - dont forget to join that group if you are not already a member as its a good way to get info about upcoming Hochanda Show and to see gorgeous inspiring makes from the Bee Crafty Team and other Bee Crafty Fans
Items used in this Project from Bee Crafty...
For today's project I stamped and coloured some of the smaller Oak Leaf from the BEAUtanicals Oak stamp set, I coloured them using shades of brown alcohol marker to tie in with the colours I chose to colour 'FASHIONettes - Rosie' - I adore these cute girlies they are so much fun to colour
I picked a 7x7inch Cardblank and added some layers to the front using backing papers and brown cardstock which I distress inked the edges using Frayed Burlap distress ink, I also ran a dark brown alcohol marker along all the edges. I layered them up with a punched edge offcut of the same brown cardstock, I matt & layered the coloured image to create a toppeer and attached it to the card using foam tape to add some dimention
I used a glue gun to fix the leaves to the card, tucking them under the coloured image topper. I stamped the 'WORDage - Life & Rain' sentiment using brown archival ink, matted using an offcut of brown cardstock and fixed to the card front using the glue gun tucking the sentiment slightly under the image topper. I used some grey/blue flat back pearls to finish
Thank You so much for visiting my Post today, please visit the Bee Crafty Blog soon to see more Gorgeous makes from the Amazing Design Team
Krafty Hugs xx
Monday, 6 June 2016
Every Hour Is A Dream - 'BEAUtanicals' - Bee Crafty
Hiya and Welcome to my Monday Post for Bee Crafty
Wowser such a Busy Half Term that was with our 4 Buzzy Bee's - Hubby booked the week off so that he could spend time with us all but also to get the garden ready for Summer - he also managed to put a new ceiling up in the Bathroom. along with trips out with the Kiddies and Movie Nights he did so well to get it all done.
Why though after a Holiday do I find it so hard to get my Work Head back on?? I very nearly forgot to post this Make for you....Doh!
So this weeks make to share is a Quick and Simple card using up more of my Offcuts from my Crafty Stash (im such a hoarder)
I chose to use lots of Dotty-yumminess this time with my spotty papers and a Dotty template which I inked through using Distress Inks in nice brown tones to match the papers.
I even used a Dotty Lace punch on the Mirror Board I used as Matt & Layers.
I used the gorgeous 'Ground Elder' stamp from the 'Ground Elder - BEAUtanicals' stamp set. I stamped around the edges using the edge of the 'Dandie's Border' stamp from the 'Backdrop Borders' collection for a bit of texture
The Sentiment 'Every Hour is a Dream' is from the 'Dandelion - BEATtanicals' stamp set
Check out the Bee Crafty BLOG for more Gorgeous Makes from the Amazingly Talented Design Team x x x
Thank You so much for visiting the my Blog today - please do visit again soon for more makes from Me
Krafty Hugs xx
I would love for you to visit and follow my BLOG too if you get a chance xx
Monday, 21 March 2016
Make a Wish - Dandelion - Bee Crafty
Hiya and Welcome to my Monday Post for Bee Crafty
I would love to share with you how I made this shaped card
I have used the 'BEAUtanicals - Dandelion' stamp set
First I diecut 2 sizes of Giant Label shapes using some of my larger die's from my stash
One I cut using white pearlescent card and one from gold pearlescent
card. I fixed the smaller gold shape to the front of the white shape -
to make this card front stand up like a portrait I fixed an A6 cardblank
to the reverse to work as a stand.
I stamped the large Dandelion Seeds stamp from the set onto a piece of kraft card which I then tied brown organza ribbon around and matted brown mirror board
I stamped the large Dandelion onto a piece of linen card but with the stem curved on the stamp block. I then stamped the smaller Dandelion twice along the bottom of the card. I stamped the smaller Dandelion Seeds
around the top corner to look like they are blowing away from the large
flower. I inked around the edges and then matted with brown mirror
board.
I stamped the 'Make a Wish'
sentiments, trimmed them, inked the edges and matted on brown mirror
board. I then fixed all the pieces onto the card front at jaunty angles.
Thank You so much for visiting my post today - please do the Bee Crafty Blog soon for more Gorgeous Makes from the Amazing Design Team
Krafty Hugs xxx
Monday, 14 March 2016
Bee Crafty - BEAUtanicals - Family Masterpiece
Hiya and Welcome to my Monday Post for Bee Crafty
I wanted to share with you one of my makes showing how to use up off-cuts of pretty papers. If like me and you horde pretty paper off-cuts because you don't like to waste them - teaming them up with Beautiful Stamps from Bee Crafty is the perfect way to use them up and make Pretty Cards
I've had this pretty piece of paper for about a year and its such a shame for it not to have been used. It was an odd sized piece of paper so I made a cardblank to fit it using a piece of white pearlescent cardstock
I then chose a chalky ink to match one of the colours in the paper for this one I picked a cloudy blue, I inked the edges of the pretty paper using the cloudy blue ink and then stamped the large 'Dandelion' stamp from the 'BEAUtanicals - Dandelion' set onto an off cut of white pearlescent cardstock
I matt & layered using a chalky grey pearlescent cardstock which tied all the colours together - I love this sentiment from the 'BEAUtanicals - Ground Elder' stamp set - to finish the card nicely I used some pale blue flat back pearls
Thank You so much for visiting my Post today - Please do Visit the Bee Crafty Blog soon for more Gorgeous Makes from the Amazing Design Team
Krafty Hugs xx
Monday, 7 March 2016
Kerrie DT - Ground Elder - 'Every Hour is a DREAM'
Hiya and Welcome to my Monday Post for Bee Crafty
Today I wanted to Share one of my Samples from Last Week's 'Hochanda Shows' and give you some details of how I made it
I used the Ground Elder from the 'BEAUtanicals - Ground Elder Set' and one of the Sentiments from the 'BEAUtanicals - Dandelion Set
I have been on a declutter and using up crafty stash mission of late and part of that has been to use up some of my offcuts from my storage drawers - so for this card I chose this pretty pink and brown paper offcut and teamed it up with a pink dotty offcut and a sheet of brown pearlescent cardstock to tie the colours together - I cut two large flag shapes for the background and then used some round dies from my stash to cut the topper. on a plain piece of watercolour cardstock which again was an offcut I stamped the 'Ground Elder' using brown archival ink, I then die cut the watercolour cardstock using a smaller round die and inked around the outside using 'Spun Sugar' 'Worn Lipstick' and 'Abandoned Coral' distress inks and a round inking tool
I layeered up all the elements making sire to back them all using the brown pearlescent cardstock to tie all the colours together - I also coloured some white flatback pearls using a brown alcohol marker to tie these into the colour scheme too - I always buy these perals in white and my gems in clear so I can colour them to any theme rather than trying to match up the papers to random coloured gems
Thank You so much for visiting the My Blog today - I hope I have inspired you to use up any of those offcuts you keep for 'Just in Case' I know we all have them
Krafty Hugs xx
Monday, 1 February 2016
Bee Craft Stamps - FASHIONette's - Tracy 'Important to be Nice'
Hiya and Welcome to my Monday Post for Bee Crafty
I jumped back into my own comfortzone for today's post with Alcohol Markers and Pretty Colours
I stamped and coloured 'FASHIONette - Tracy' and coloured her using my Alcohol Markers to match the papers I chose. I stamped the swirl part from 'Yuletide - Holly Swirl' (Christmas stamps are not just for Christmas) around the edges of the image using 'Pumice Stone' Distress Ink to make into a topper. The Sentiment 'Important to be Nice'
is from 'WORDage' collection, I stamped this using the same Distress
Ink, layered with some dark brown card and fixed between the layers at
the side of the 'Tracy' topper
I created the floral bouquets using 'Fabulous Flowers - Star Flowers' stamped using 'Pumice Stone'
Distress Ink, fussy cut them out and coloured them with Alcohol markers
to match the image. I also used the 'Larger Branch' from the 'BEAUtanicals - Branches' set using the same distress ink, fussy cut them out and layers these up with some diecut swirls around the Flowers
Thank You so much for visiting my Post today - please visit the Bee Crafty Blog again soon to see more Gorgeous Makes from the Talented Design Team x x
Krafty Hugs xxx
Labels:
BEAUtanicals,
Bee Crafty Stamps,
Branches,
Copic Markers,
Design Team,
Distress Ink,
Fabulous Flowers,
FASHIONette's,
Holly Swirl,
Important to be Nice,
Inspiration,
Star Flowers,
Tracy,
WORDage,
Yuletide
Monday, 5 October 2015
Bee Crafty - Never Regret - Maple Leaf Flower
Hiya and welcome to my Monday Post for Bee Crafty
This week I am sharing with you an elegant make using the 'Wordage - Never Regret - Large' sentiment stamp as the main topper for the card and a handmade Flower made using the 'Beautanicals - Maple Leaf Solid' stamp
I was thinking of what to make and I wanted to put a flower on the side
of a sentiment and I suddenly had the idea to make the flower using the
Maple Leaf stamp
I stamped the Leaf stamp 6 times using a permanant lilac ink stamp onto
pearlescent cardstock, I cut them out and shaped them using a foam mat
and a large ball tool, I then fixed them together using a glue gun each
one was layered on top on the one below offset to create a rosette
flower. I stamped the 'Beautanicals - Branches' large branch onto more pearlescent cardstock using brown permanent ink then cut those out.
I created the cardfront using lots of layers of cardstock which I had
grabbed from my offcuts box again - I am a little addicted to using my
offcuts and this shows just how pretty they can look. I added some lilac
textured card in to tie all the elements together. The light beige
cardstock is from a stamp set packaging (too pretty to throw away) which
I wrapped brown spotty ribbon round then fixed to the cardfront.
The sentiment topper I made by die-cutting a large circle die from
pearlescent cardstock and stamping the sentiment into the centre, inking
the edges using the lilac ink again. I fixed this to a circle cut from
the lilac textured cardstock then layering this onto a diecut doily
circle and fixing to the cardfront centre using foam tape.
I used a glue gun to fix the flower to the right corner above the
sentiment and fixed the leafy branches using the glue gun and slipping
under the flower on each side. To finish i tied the left over ribbon
into a bow which I attached on top of the ribbon using the glue gun
again.
Thank You so much for visiting the Bee Crafty Blog today, please come back soon to see more Gorgeous Makes from the Brilliant Design Team
Krafty Hugs xxx
Monday, 21 September 2015
Spookylicious Abi Grace - for Bee Crafty
Hiya and Welcome to my Monday Post for Bee Crafty
Wowser these weeks are flying by so fast and Autumn is in full swing so out came my Halloween Stamps and papers
I had a lot of fun making this card using the Gorgeous 'Spellbound Abi' stamp set, Ive added lots of layers and extra stamps 'Spooklicious' from the Spellbound Abi set, 'Spiderweb' & 'Spooky Scene' from the All Hallows collecion and the BEAUtanicals 'Large Branch'
I coloured Spellbound Abi using my fave Copic Markers after stamping
her using a pale grey inkpad to give the no lines look which I love.
I stamped the Spooky Scene, Large Branch and Spooylicious onto a
gorgeous Halloween Backing Paper from my stash to create the background
of my card. I then added a few offcuts from my scrap box which I matted
using silver mirror board off cuts (using offcuts for smaller layers is
great as you then dont have to cut into new sheets and you save a lot of
wasting)
The music score I cut from another seet of Halloween Backing Paper from
the same pad as before - I love this paper pad and will be making a few
more Halloween makes from it this year
To finish up my card I have used lots of matt & layering, Diecuts,
lots of distress inks for edges and I layered the elements using foam
tape and jaunty angles
Thank you so much for visiting my Blog today, check out the Bee Crafty Blog
for more Gorgeous Makes by the Amazingly Talented Design Team I am
always in Awe of the stunning creations they make
Krafty Hugs xx
Labels:
Abi Grace & Kaitie Mai,
All Hallows,
BEAUtanicals,
Bee Crafty,
Bee Crafty Stamps,
Copic Markers,
Design Team,
Distress Ink,
Halloween,
Large Branch,
Spellbound Abi,
Spiderweb,
Spooky Scene,
Spookylicious
Monday, 7 September 2015
DT Kerrie - Planning with my Bee Crafty Stamps
Happy Monday and welcome to my Post for Bee Crafty
Wowser its been such a busy week with my 4 kiddies starting back at
school today, all the uniform sorting and finishing up projects - nice
to be back to routine but I miss them all - its so quiet today - but
that does mean more time to craft so its all good
I have been using some of my Fave Bee Crafty Stamps in my Purple Planner this week, hense why my post is a bit late as I was finishing up filling in Sunday xx
The stamps I have used are... Beautanicals 'Dandelion', Beautanicals 'Branches', Wordage 'Value of a Moment' & Wordage 'Glad I Did It'
I stamped them using Chalk Inks, going over some details using my
coloured fine liner pens - some across the tops and bottoms of the pages
and some as accents on the plan days - I love to add colour and doodles
to my planner pages but stamps are by far my favourite planning tool
and im always on the look out for more designs and sets to use
I couldnt resist filling these pages up using my 3 fave colours, Teal, Pink & Purple
I hope I have given you a few ideas for using your stamps in other
crafts - decorating planners is all the rage across instagram, facebook
and blogs Im addicted but I have always loved to plan&list daily
Thank You so much for visiting today to see my post
Krafty Hugs xx
Subscribe to:
Posts (Atom)