Followers

Showing posts with label Mirror Board. Show all posts

Monday, 22 June 2015

Flower Girl Abi - Blooming Beautiful - Bee Crafty

Hiya and welcome to my Design Team Post for Bee Crafty
I have been on a de-clutter mission in my Kraft Korner and I found a whole box of off-cuts from lots of pretty papers and I decided to use them up rather than throw them away - so my project this week is made using 2 pretty off-cuts, Gold Mirror Board and some Paper Flowers from my stash
I chose to use one of my new stamps 'Flower Girl Abi' I then coloured her using Alcohol Markers to match the colours in the papers
This a close up of Abi all coloured

And this is my finished card

I stamped the Sentiment that is part of the 'Flower Girl Abi' stamp set. I finished my card with a pink foam flower and some flat backed pearls from my stash
Thank you for visiting today, come back soon for Gorgeous Makes by the Brilliant Design Team
Krafty Hugs xx

Monday, 15 June 2015

'Rose Garden Abi' - Happy Birthday/With Love - Bee Crafty

Hiya and welcome to my Monday Post for Bee Crafty 
Over the weekend I was busy reorganising some of my clear stamp collection into empty CD Cases, this has been very time consuming so I took a break and made my DT Project for this week, I chose to use a (new to my 'Bee Crafty Stash') stamp from the 'Abi Grace & Katie Mai' collection. They are so so Adorable and I'm sure you will love them just as much as I do.
I stamped 'Abi' using light grey ink and coloured her using Alcohol Markers
I have coloured to match the backing papers I chose to use - light pastels - I also coloured matched some distress inks to add stamped and inked edges surrounding her to form a frame as a topper for my project - the stamps are I used are 'Holly Swirl' & 'Cow Parsley' - I love to use the Holly Swirl's edge for crafting all year round as it looks so cute as a foliage detail around card edges etc.
I die cut some flowers and foliage using dies and the offcuts from the Papers I used - The Sentiment's are from th Wordage 'Happy Birthday/With Love' set - I layered these up in opposite corners of the topper which I had attached to the card front using foam tape after tucking a doily in behind it

For the matt's and layer's I have used silver mirror board, for the picture above I took the photo at an angel to show the mirror board without my reflection (which is in the other picture - ooops)

Thankyou so much for visiting today, do come back soon to see the Beautiful Makes by the Wonderful Design Team here at the Bee Crafty Blog - Have you joined the Bee Crafty Facebook Group yet??? head on over now and check it out

Krafty Hugs xx

Tuesday, 2 June 2015

Shades of Summer - Crafting Musketeer's

Hiya and welcome to my Blog

Today I am sharing my makes for the New Challenge over at the  Crafting Musketeer's Blog 
The theme this month is 'Shades of Summer' over on the Blog you can see all the Beautiful Makes from the Amazing Design Team

This month we are being Sponsored by 'The Hobby House'a lovely shop full of crafting lushness

The Hobby House

I created 2 cards for the Challenge as I got a little carried away with the Summer Colours


For the first card I have used backing papers and a glittered die cut topper from an old but pretty 'Woodland Friends' kit by Docrafts - embellished using diecuts, paper flowers, mirror board and heart shaped gems


The second card I have made using another oldie but goodie kit, I have forgotten the name of but is gorgeous and full of wild animals and pretty backing papers, I used a diecut Giraffe and Flowery paper from the kit and embellished with paper flowers, diecuts, mirror board and gold gems

Thank you for visiting my blog today - do please check out the Crafting Musketeers Blog and enter as the prize is really lovely

Krafty Hugs xx
Kerrie 
Crafting Musketeers DT

Friday, 1 May 2015

FASHIONettes 'Peggy' - Decision to Try - Bee Crafty

Happy Friday so its my turn to post for Bee Crafty
I ordered some new Stamps & Inkables Templates in the last 2 weeks and couldnt wait to get inky - I love the FASHIONette's so much and I've been eager to try out the templates with my Distress Inks

I stamped 'Peggy' onto watercolour cardstock (which I had trimmed to fit an 8x8 cardblank with a few mm border) using Archival Ink because I wated to use lots of water and didnt want the image to bleed. I then stamped again onto eclipse masking tape and cut her out to make a mask which I fixed over her on the watercolour cardstock.

The background I created by blending 'Antique Linen' & 'Tattered Rose' distress inks using a round blending tool. I then placed the 'Circles' inkables template over the corners and sprayed through with water, then used a 'microfibre cloth' to remove the excess water and lift the colour away from the wet areas too. this showed up quite faint though as the colours I used were a bit pale.

Next I used the 'Metalwork Alpha' inkables template around the edges using 'Victorian Velvet' distress ink. I inked the edges using 'Pumice Stone' distress ink. I sprinkled over some rock salt and sprayed with water, waited for the salt to react a bit then dried the card using a heat gun on a low setting. I brushed the salt off to reveal the speckles where it had reacted with the ink.

Next I stamped the 'Maple Outline' stamps slightly off the page and painted over them using 'Pumice Stone' distress ink. I also randomly stamped the 'Large Branch' BEAUtanicals stamp accross the top of the card and 'Dandies' Backdrop Border stamp along the bottom of the card using 'Frayed Burlap' distress ink.

I also randomly stamped the 'Cow Parsley' & 'Branches' BEAUtanicals stamps randomly using 'Tattered Rose' & 'Victorian Velvet' around the edge of the card.

I reused the 'Circles' inkables template around the corners again dry template this time using 'Antique Linen' distress ink and the round blending tool, this showed up a lot better with the paler colours.


I then removed the mask from 'Peggy' which revealed that no ink had slipped through and she was perfectly blank for me to add colour to. I used Distress Inks as watercolours using a blending mat and a waterbrush. The colours I used were all the same ones from the background.

I matted the finished picture onto dark brown mirror board and attached to my 8x8 cardbalnk using foam tape.

 
Lastly I stamped the 'Decision to Try' WORDage stamp onto an offcut of watercolour card using the 'Pumpice Stone' ink, I then trimmed the words out and matted them onto dark brown mirror board, I then fixed them to the finished card using foam tape for dimension.
Thank you for visiting today, dont forget to check back soon for more gorgeous makes by the Brilliant Design Team and stop by the 'Bee Crafty Facebook Group' to join in the fun
Krafty Hugs xx

Tuesday, 17 March 2015

BEAUtanicals - 'Dandelion' - Bee Crafty

Hiya and welcome to my Tuesday post for Bee Crafty 
For my card today I have used a mixture of my favourite Bee Crafty polymer stamps

I stamped the Script stamp over the background using 'Pumice Stone' distress ink, then the Bubble Wrap stamp into the corners using 'Walnut Stain' distress ink.
Using 'Spun Sugar' distress ink using one of the small round blending tool in circular motions darker into the corners and lighter around the sides, then using a piece of blending sponge i inked the edges using 'Walnut Stain' distress ink.
I stamped the Bubble Wrap again using White chalky paint 


I stamped the Dandelion using 'Black Soot' distress ink, then stamped just the blown away seeds randomly around the outside of the card. Using 'Black Soot' again I stamped the Being Happy sentiment near the corner.


I have used some Pink textured cardstock and some Mink mirror board from my stash for the layers and before i fixed the stamped section I inked over all the edges of the layers and card blank using 'Spun Sugar' distress ink.

Thank you for visiting today please do visit again soon to see more Bee Crafty makes from the team 
Krafty Hugs xx

Saturday, 31 January 2015

Smile! - Sketch Saturday


Hiya and welocme to my Blog so sorry its late in the day Ive been offline all day and didnt realise it hadnt gone live

This is my last post as Guest Designer for Sketch Saturday - its been a lot of fun - thank you to Vannessa for inviting me

Today a new Challenge started over at Sketch Saturday its a pick your Fave Sketch Challenge so you get to look through previous sketches and pick which one to use... all the details can be found over on the Sketch Saturday Blog

This week the Challenge is sponsered by 'Drawn with Character'

I chose to use Sketch #323
and Image 'Holy Shirt' from Slinky<3Tart - I coloured her using Copic Markers


Hair: E37, E35, E31
Skin: E04, E11, E21, E00, E000
Eyeshadow: RV11
Lips: RV11, RV21, RV10
Tshirt & Eyes: YG63, YG61

I chose this sketch as I thought the square remineded me of a polaroid photo so i used my Cameo to cut a polaroid shape


I trimmed the coloured image so that it fitted behind the polaroid shape and matted them both onto golden brown mirror board.
I trimmed a piece of stripey patterned paper to 1/8inch smaller than the 6x6 scalloped cardblank. I used a scallop lace edge border punch along the bottom edge of the paper and then matted onto golden brown mirror board. 
I wrapped a pale pink ribbon around the patterned paper panel and fixed to the card front using 1mm deep foam tape.
I fixed the polaroid to the card front at a jaunty angle using foam tape. I printed the 'Smile!' sentiment using Docrafts Digital Designer, cut it out using a small circle die, matted with mirror board and fixed behind the polaroid shape.
I used some paper flowers from Wild Orchid Crafts and some flat back pearls to finish the card

I hope you will take part in the Sketch Saturday Challenge and will visit my Blog again soon - please follow if you havent already

Krafty Hugs
Kerrie xx
January GDT Sketch Saturday


Saturday, 24 January 2015

Kn(owl)edge - Slinky Tart - for Sketch Saturday

 
Hiya and welcome to my Blog

Today I am showing you a card I made for Sketch Saturday Challenge Blog as Guest Designer

I hope you will visit the BLOG to see the Design Team makes and to see what they all created using the following the sketch below...


The Image I have used is called 'Kn(owl)edge' by SlinkyTart 


I coloured her using Copic Markers:

Hair: E49, E44, E43, 
Skin: E04, E11, E21, E00, E000 Blush: R20
Eyeshadow: C5, C3, C1
Eyes: B39, B37
Lips: E09, E04, R02
Tshirt, Glasses & Diamonds: RV29, R22, R20
Tank Top: B39, B37, N5


Recipe:

8x8 Cardblank (from The Range)
Navy Stripe & Floral Papers - 24.5 x 24.5cm Paper Pad (from Creataonline)
Centura Pearl Cardstock die-cut using Circular Doily Die (from JoyCrafts)
Coloured Image topper cut from - Circle Die from Xcut
Topper edges inked using Spun Sugar Distress Ink
Stretch gift wrap cord wrapped around the Card
Best Wishes sentiment stamp from my Stash
Silver Mirror Board for all Matting
Paper Roses from Wild Orchid Crafts
Pink Gems from my Stash

See you again soon

Hugs
Sketch Saturday GDT-Jan2015

Tuesday, 20 January 2015

FASHIONette Vera - Inky but Pretty

Hiya today I posted my DT make over on Bee Crafty Stamps Blog and I wanted to share here too

Come on over and join the Bee Crafty Facebook Group HERE!

I made myself a promise this New Year that I would make use of as much of my crafty stash as I could without spending too much on New - well I've still been tempted with a few new things like magazines and a new case for my Copic Markers but I have also got out some old favourite things like Versamark and Clear Embossing Powder 
I stamped FASHIONette's 'Vera' using Archival Ink and then made a mask of her using Eclipse Tape (another oldie but goodie) I covered the stamped image using the mask and then rough stamped the 'Backdrop - Bubble Wrap Positive' stamp over, I removed the mask which left her uninked. I then coloured her using my Spectrum Noir Pencils
Hair: 099, 096, 095, 091
Skin: 007, 005, 004, 034
Dress: 026, 031, 034
Spots & Sash: 047, 058, 056
Shoes & Earrings: 117
The Background Paper I created using BEAUtanicals 'Cow Parsley' & 'Branches' stamps with Versamark and Clear Embossing powder which I heated with a heat gun to create a resist, I then inked over using Distress Inks (Spun Sugar, Victorian Velvet, Shabby Shutters & Tea Dye) but the stamped areas stayed white and raised. I then stamped a smaller stamp around using distress ink to add a different texture


I also stamped the larger leaf stamp onto cardstock and cut out to created the leaves for my floral embellishment.

Paper Flowers and Golden Brown Mirror Board are from my own stash
I hope you like the softer artsy look I created this week and I do hope you will visit the blog again soon there are different posts each day from different team members
Krafty Hugs

Sunday, 4 January 2015

Monochrome Challenge - That Craft Place Blog


Hiya and welcome to my Blog

Today we have a New Challenge over at That Craft Place Challenge Blog and the theme is Monochrome - the Design Team have all been working hard to show off different colours of Monochromatic Cards - Monochromatic is many shades of one colour and white

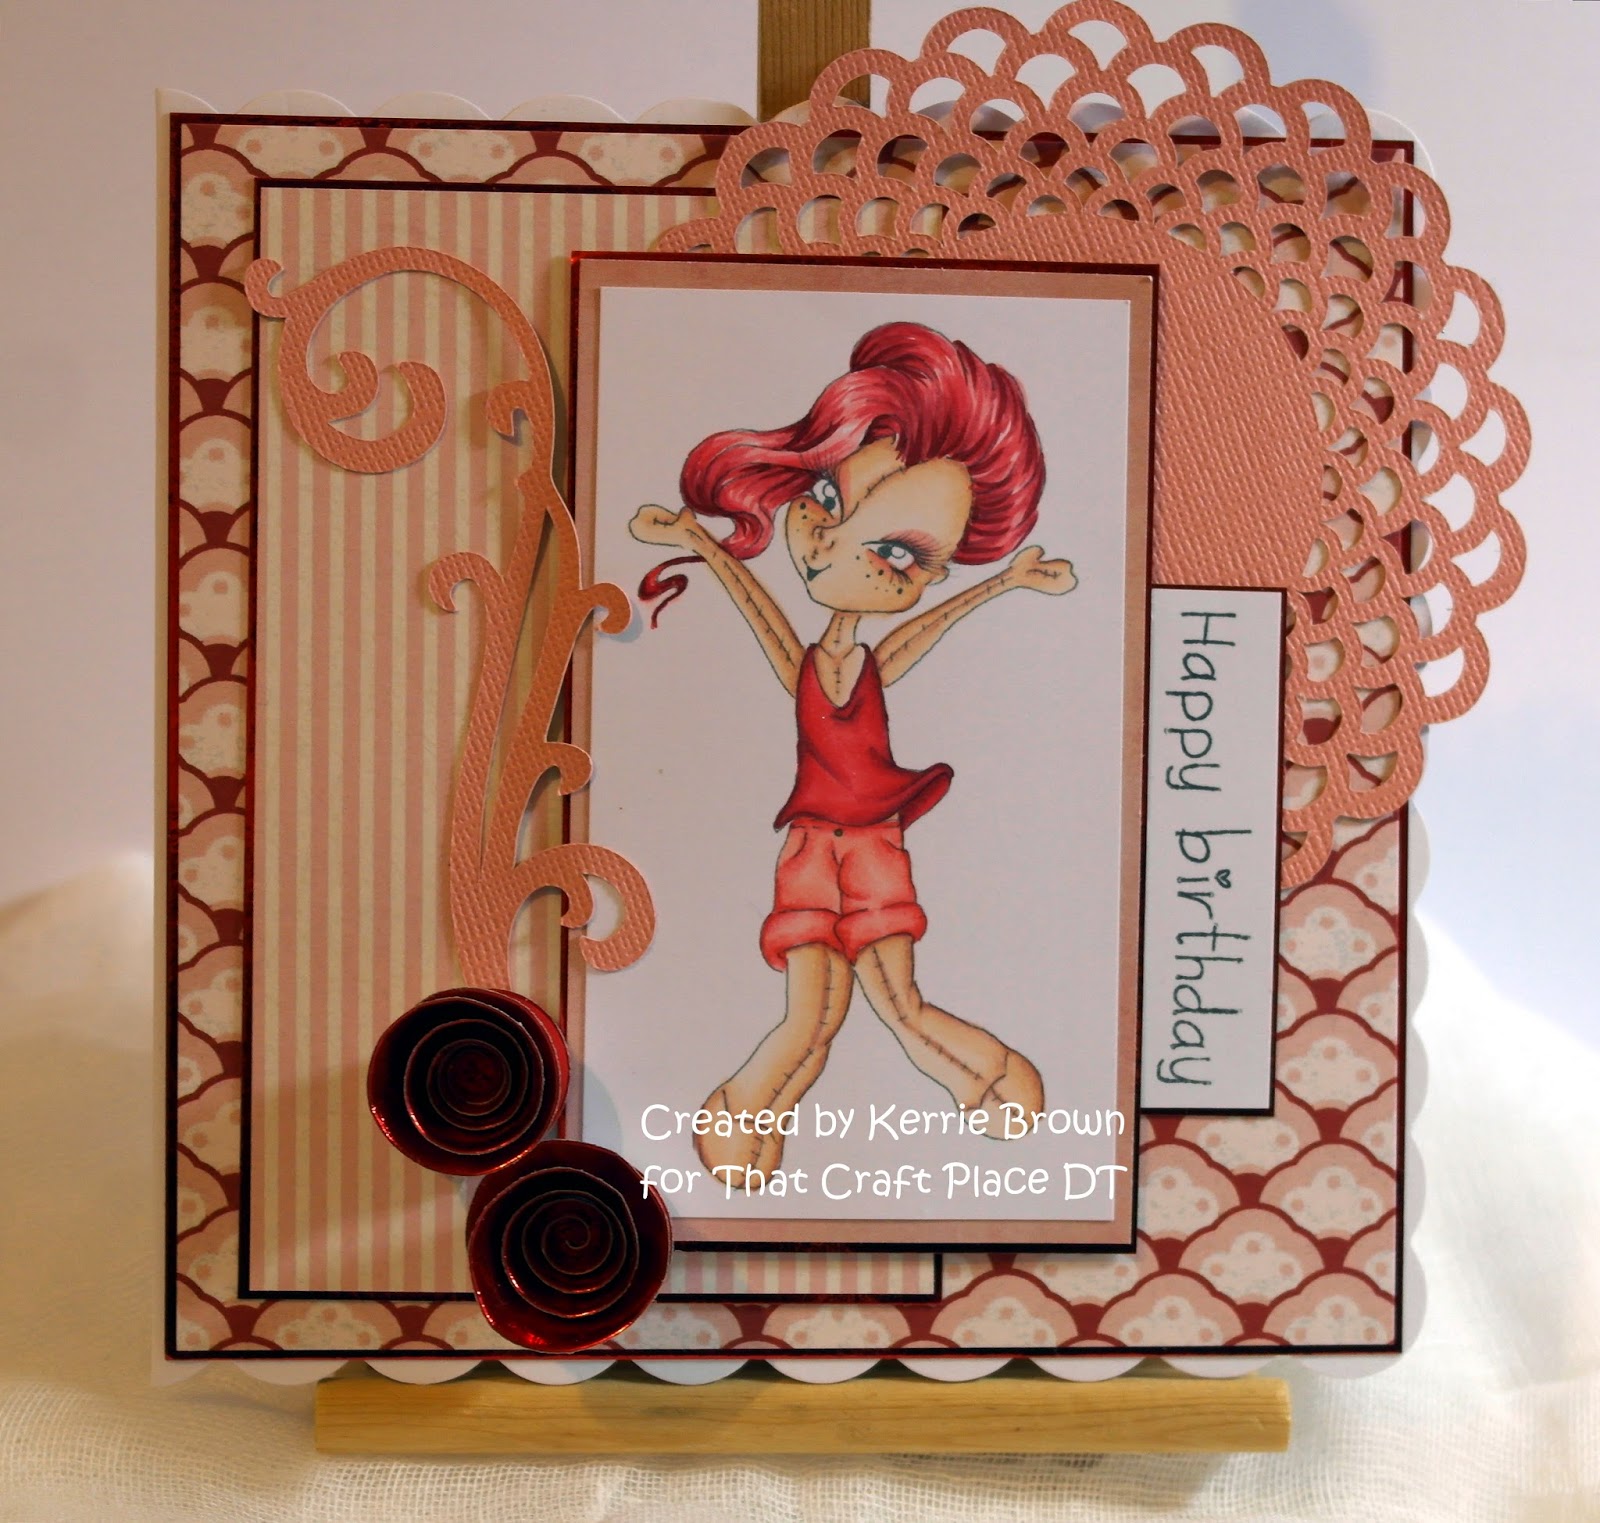
I chose to use many shades of Rose for my Design Team make

I picked this pretty 'Sugar & Spice' digi image to colour up - her name is 'Sugar Jump' and you can get yours over at the That Craft Place Etsy Shop

I coloured her using Copic Markers

Hair: R59, R39, R37, R35, R32
Skin: E04, E11, E21, E00, E000
Makeup: R22, R20
Vest: R59, R39, R37, R35
Shorts: R27, R24, R22, R20

Recipe

6x6 Scalloped Cardblank
My Minds Eye papers 'Lost & Found 3 - Ruby'
Mirror Board 'Ruby Red' from my own stash
Flourish & Doily cut using my Cameo machine
Cordinations cardstock in Rose
'Pinwheel Posie' die from Memory Box - rolled using a quilling tool

you can buy these papers, Die, Cameo and cardstock from That Craft Place either in store or on Facebook

Dont forget to visit the Challenge Blog to see the Design Team makes and to enter your card 

Head on over to the That Craft Place Facebook Group to buy yummy stash and join the Chat Group too to share your That Craft Place makes and to see makes by the Design Team too 

I hope you will visit my Blog again soon

Krafty Hugs
Kerrie xx
That Craft Place DT

Wednesday, 3 December 2014

Christmas Elf - Anything Goes Challenge for TSC


Hiya and welcome to my Blog today a New 'Anything Goes' Challenge over at The Stamping Chef Blog - don't froget to visit and check out the gorgeous projects from the Design Team

I have chosen to use 'Flox' for this make as Im working through my Christmas Cards for Family 


I coloured her using Copic Markers

Hair: E37, E35
Skin: E04, E11, E21, E00, E000
Coat & Hat: R27, R08, R17
Buttons: E49, E44
Trousers, Scarf, Gloves, Eyes, Snowflakes & Tassels: BG13, BG11
Snow, Hat & Coat Trims: C3, C1, C0


I've set myself a challenge to use products I've not used before or need to use up so all the Items below are either never before used from my Christmas Stash

Recipe:
7x7inch Cardblank
Backing Paper 'Berry Merry' by Jennifer Ellory
Gold Mirror Board from 'B&M store'
Doily from 'Hobbycraft'
Festive Parcel Tape from 'Lidl'
Red Cardstock (from my own stash)
Poinsettia Stamp from 'Wonder Collection' by Penny Black
Snowflake's & Swirl stamps from 'Enchanted Christmas' by Hot Off The Press
Poinsettia Die by 'Sue Wilson' from Spellbinders
Poinsettia Paper Flower (from my stash)
Sentiment (typed and printed my laptop)

I hope you like my card today and will visit again soon

The Stamping Chef has a massive SALE over on The Shop why not check out some Bargains 

Hugs Kerrie xx
TSC DT


Thursday, 27 November 2014

I would Thank You from the Bottom of my Heart....


Today there is a New Dare To Be Sassy Thursday (DTBST) Challenge over on the Sassy Studio Designs BLOG and the theme is 'Giving Thanks'

I chose to use one of the New Images from the Sassy Studio Design's Store 'Princess Feathers Portrait' she was really fun to colour


I coloured her using Copic Markers

Hair: C9, C7, C5
Skin: E44, E43, E41
Eyes: E44
Lips, Feathers & Headband: R24, R22, R20


Recipe

A5 cardblank made with Centura Pearl cardstock.
Studio Light Backing Paper backed with dark brown Mirror Board.
Hessian Strip with strip of dark brown Mirror Board for dimension.
Oval die (Joycrafts) that cuts a border and an inner, cut the border from Mirror Board and the topper from super smooth cardstock that I had printed the Image onto.
Leaves and Mushroom dies (Joycrafts) cut from Mirror Board and Kraftcard, layered up.
Sentiment from 'Scrap-a-licious Times' trimmed and backed with mirror board, fixed at a jaunty angle.

I hope you like my card and will visit the Sassy BLOG to see the other makes from the Design Team and enter the Challenge go on its a lot of fun.

Thank you for visit my Blog I hope you will visit again soon

Hugs Kerrie xx
Sassy DT

Saturday, 22 November 2014

Portraits - New Release Blog Hop - Sassy Studio Designs

Hiya and welcome to my Blog

Today is a very exciting day for Sassy Studio Designs as the Design Team get to share with you their makes using the New Sassy Portrait Images 

You should have arrived here from Sassy Studio Designs Blog if you have just found your way here from elsewhere please start at the beginning you you dont get lost along the way 

I have been making with 'Scarecrow Portrait'


I coloured her using Copic Markers


I chose papers to colour match my colouring and some brown mirror baord for Matt & Layering behind the image. I fussy cut the image and attached to the front of the card using glue gel. I diecut some leaf stems to tuck behind some paperflowers, some are printed and fussy cut and some are from wild orchid crafts.

The sentiment I printed using my laptop, I was inspired by the 'Scarecrow' song from the Wizard of Oz to make this card and I was singing 'If I only had a Brain' the whole time i was making it.

I hope you like my project and are enjoying the hop today

Hugs Kerrie x x
Sassy DT

Your next stop along the Hop is the Brilliant Karal's BLOG 

Thursday, 13 November 2014

Its Beginning To Look Like Fall - DTBST - Sassy


Hiya it's Thursday again which means the start of a New 'Dare To Be Sassy Thursday' Challenge over at the Sassy Studio Designs BLOG 

The theme this week is 'It's Beginning To Look Like Fall'

The Sassy Team would like to see your projects made using the colours of 'Fall'

That means 'Yellow, Orange, Red, Gold'

You dont have to use a Sassy Studio Designs Image to enter but if you do you get to enter twice

Here is my Project for today's Challenge I have used 'Holiday Pie Sassy' as my Image


This Image is also part of our Flash Back Friday post this week, she will be available at a discount price in Store for one week so go over and grab her quick as she will go back to full price next Friday.

I have coloured her using Copic Markers

Hair: E49, E44, E43
Skin: E04, E11, E21, E00, E000
Eyes: YG95, YG91
Lips: E09, E07, E04
Pearls: YR000, YR21
Belt & Shoes: E49, E44, C3
Dress: R08, YR07, YR04, YR02
Pie Tray & Steam: C3, C1
Pie Crust: E35, E31, E44


I made my own backing paper using a piece of ivory cardstock, distress inks and a lovely leaf stamp from Paperbabe Stamps.

I used some matt & layering using a printed backing paper from a Serif Thanksgiving Digi Kit, some offcuts of cardstocks from my stash and dark brown mirror board.

I used a leaf die from Joycrafts for all my embellishments. For a little extra touch I printed a Thanksgiving Menu and tucked this behind the topper.

The sentiment stamp is also from Paperbabe stamps.

I hope you like my card and will visit again soon

Please do visit the Sassy Studio Designs BLOG to see the other Design Team projects and to enter the challenge.

Hugs Kerrie xx
Sassy DT

Wednesday, 12 November 2014

Merry Christmas with Tonic & Bebunni

Hiya I have officially begun making my Christmas Cards - even though I've been making Christmas samples since June I've finally started making my own 

This is one of the First makes for Christmas this year 

I have teamed up on of my Bebunni Christmas stamps from Crafters Companion with some Dies from Tonic


I coloured Bebunni using my Copic Markers

Fur: C5, C3, C1
Inside Ears & Label: W3, W1
Hat & Poinsettia: R29, R27, R24
Hat Trim & Bobble: C2, C0
Stamens: Y00, YG61
Leaf & Stem: YG67, YG63, YG61


I have used the Border from 'Verso Merry Christmas Sentiment Die Set' to create a topper to stamp onto. I created a Matt using the Outer Edge from the set too its a lovely wavy edge.

The Red backing paper I used is from a Studio Light pad from Creataonline.

For the Easel Card stopper I have used the 'Small Lacy Bows Die Set' I cut the Bow first from green mirror board from Joycrafts and then from White cardstock using the filagree insert dies from the set.

The Easel Card I made using two 6x6 Card Blanks.

I cut the sentiment stamp using a small circular die, I cut one matt from a slightly larger circular die and then the scallop matt using the outer edge die from the 'Tonic Gold Freebie Set'

I added some paper flowers layered up with 2 punched leaves to embellish.

I hope you like my Card and will visit again soon

Krafty Hugs
Kerrie x x


Tuesday, 7 October 2014

October New Stamps Showcase #1 over at Paperbabe Stamps

Oh so exciting today we have a chance to show off some of the New Stamps for October over at Paperbabe Stamps Blog - do please visit there to see more Samples from our Kim and the Design Team

The new stamps are so much fun to use and all can be used to layer up and over-stampI had a lot og fun with them xx

Today we get to show off to you

'Completely Conkers'


& 'Spritz and Speckles'


I had a lot of fun with these two sets I love the way they can be layered up and pieced together any way that you choose

My Example for 'Spritz and Speckles'


This simple birthday card I made using some of the stamps from the set layered over each other in opposite corners using 3 colours of Chalky Ink Pads (from my stash) I picked the colours to match a few papers I chose to use from a dark arty pad of backing papers I had but never know what to use them for - A few strips cut into banners and a piece used as a backing sheet were just enough (so I have plenty left for more cards later) I chose a lovely scallop edge cardblank but used this turned to the side so scallops are along the sides and bottom of the card. One of the banners I created using the border strip from the 'Fabulous Everything' stamp set from Paperbabe.

The border I cut from an offcut of micro corrugated paper from my offcuts box (a new habit I have taken up to use them up I sont like to waste anything) - the sentiment I made using some of the word stamps from the 'Fabulous Everything' stamp set.

I layered all the pieces together using all purpose glue and then wrapped some frayed burlap (from my stash) around the whole thing before fixing to the cardblank with 1mm thick foam tape.

My Example for 'Completely Conkers'


I really enjoyed making this Birthday Card this is such a cute set and can be used for so many occasions for absolutely anyone especially the Boys and Men in your life I know my Son's would love this one a lot.
I made a backing paper using the Leaf stamp from the set and some Autumn colours of Ink Pads from my stash. once dry I layered this paper using brown mirror board, wrapped some frayed burlap around the panel then fixed to a scallop cardblank using 1mm foam tape.
Using a smaller piece of stamping card I stamped 2 of the Conkers from the set using Chalky Ink Pads (I love that you get the two sections for each conker so you can layer colours easily), I stamped the conker strings, knots and bows using Memento Ink Pad in black. In opposite corners I stamped the leaf again with the Autumn colours Ink Pads. I then stamped the Smash-Rebound stamp using pale chalky inkpad to make the conkers look like they have just smacked together.
To finish I stamped the sentiment from the set on 'Smashing Birthday' the words are close together in the set to I inked the stamp first then wiped off the ink from Birthday so I could stamp just 'Smashing' first, next I stamped 'Autumn' just underneath, the repeated the ink and wiped off Smashing to stamp just 'Birthday' just underneath Autumn. (make sure to wipe all the ink off the word you don't want to stamp first or you will get marks on your card)

I hope you like what I have created using the new stamps thank you for stopping by see you again soon

hugs Kerrie
Paperbabe DT
xxxx

TCBOTB Background

Related Posts Plugin for WordPress, Blogger...