Followers

Showing posts with label Wild Orchid Crafts. Show all posts

Monday, 8 June 2015

Kerrie DT - Peggy 'Dreams Come True' - Bee Crafty

Hiya and welcome to my Monday Post for Bee Crafty
Today I am sharing with you a pretty shabby chic project made with 'Peggy' from the 'Fashionette's Collection' - I've gone back to my fave style of cardmaking this week, Colouring with Alcohol Markers and lots of layers
 I stamped 'Peggy' onto super smooth cardstock using a light grey dye inkpad and coloured her using Alcohol Markers - I colour matched to the papers I chose 
The colour tones of the paperpad I chose are quite dusty and vintage looking which I really love, I couldnt resist rounding some corners using a corner punch and inking up the edges using inkpads, I also edged the two background layers using a dark brown alcohol marker. The brown layer I used the 'Circles' Inkables Template I brought from Bee Crafty recently, I embossed the cardstock using the template and an embossing machine, I then inked over the whole cardstock to being out the texture of the circles
I fixed the layers to the card front at jaunty angels. I then stamped the larger branch from the Beautanicals 'Branches' set onto textured carstock 4 times and fussy cut them to create the foliage for the Paper Flowers I've used in oposite corners of the card
The sentiment is part of the 'Dreams Come True' stamp. To stamp juat the part I wanted to, I cover the rest of the words using masking tape then inked the stamp, I removed the masking tape and stamped the sentiment onto cardstock
I have used Brown Mirror Board for the Matt&Layering and to finish I added some Glittered Dome Gems which I had coloured using the Dark Brown alcohol marker again
Thankyou for visiting today - come back soon to see more gorgeous makes by the Design Team
Krafty Hugs xx

Tuesday, 10 March 2015

'Vera' - Dreams Come True - Bee Crafty Stamps

Hiya and welcome to my Tuesday post for Bee Crafty (sorry I was not here last week I was poorly - but much better now) 
Today I'm sharing with you a card I made using 'Vera' from the FASHIONettes and  'Dreams Come True' from WORDage
 

I stamped Vera using grey ink for a lighter lined image and coloured her using my Copic Markers
Hair: E29, E37, E35, E49
Skin: E04, E13, E11, E21, E00, E000
Dress: R35, R32, R22, R20
Jewellery: R35, R32
Sash, Eyes & Spots: YG67, YG63, YG61
Shoes: W8


Ive created some layers using brown mirror board, floral cardstock backing paper & pink mulberry paper. On the edges/corners  have used Walnut Stain distress ink with blending tool and the curl from the end of the 'Holly Swirl' Yuletide stamp - I love how this stamp can be used everyday without it being obviously christmas - I love swirls around edges and corners

I chose flowers in shades of peach to complement and frame the image and the flowers from the backing panel adding foliage with Diecut Swirls and Punched Leaves x
The sentiment is one of my faves 'Dreams Com True' WORDage
Thank you for visiting the Blog today and I hope you will visit again soon to see the gorgeous makes by the talented Design Team
Krafty Hugs xx

Tuesday, 24 February 2015

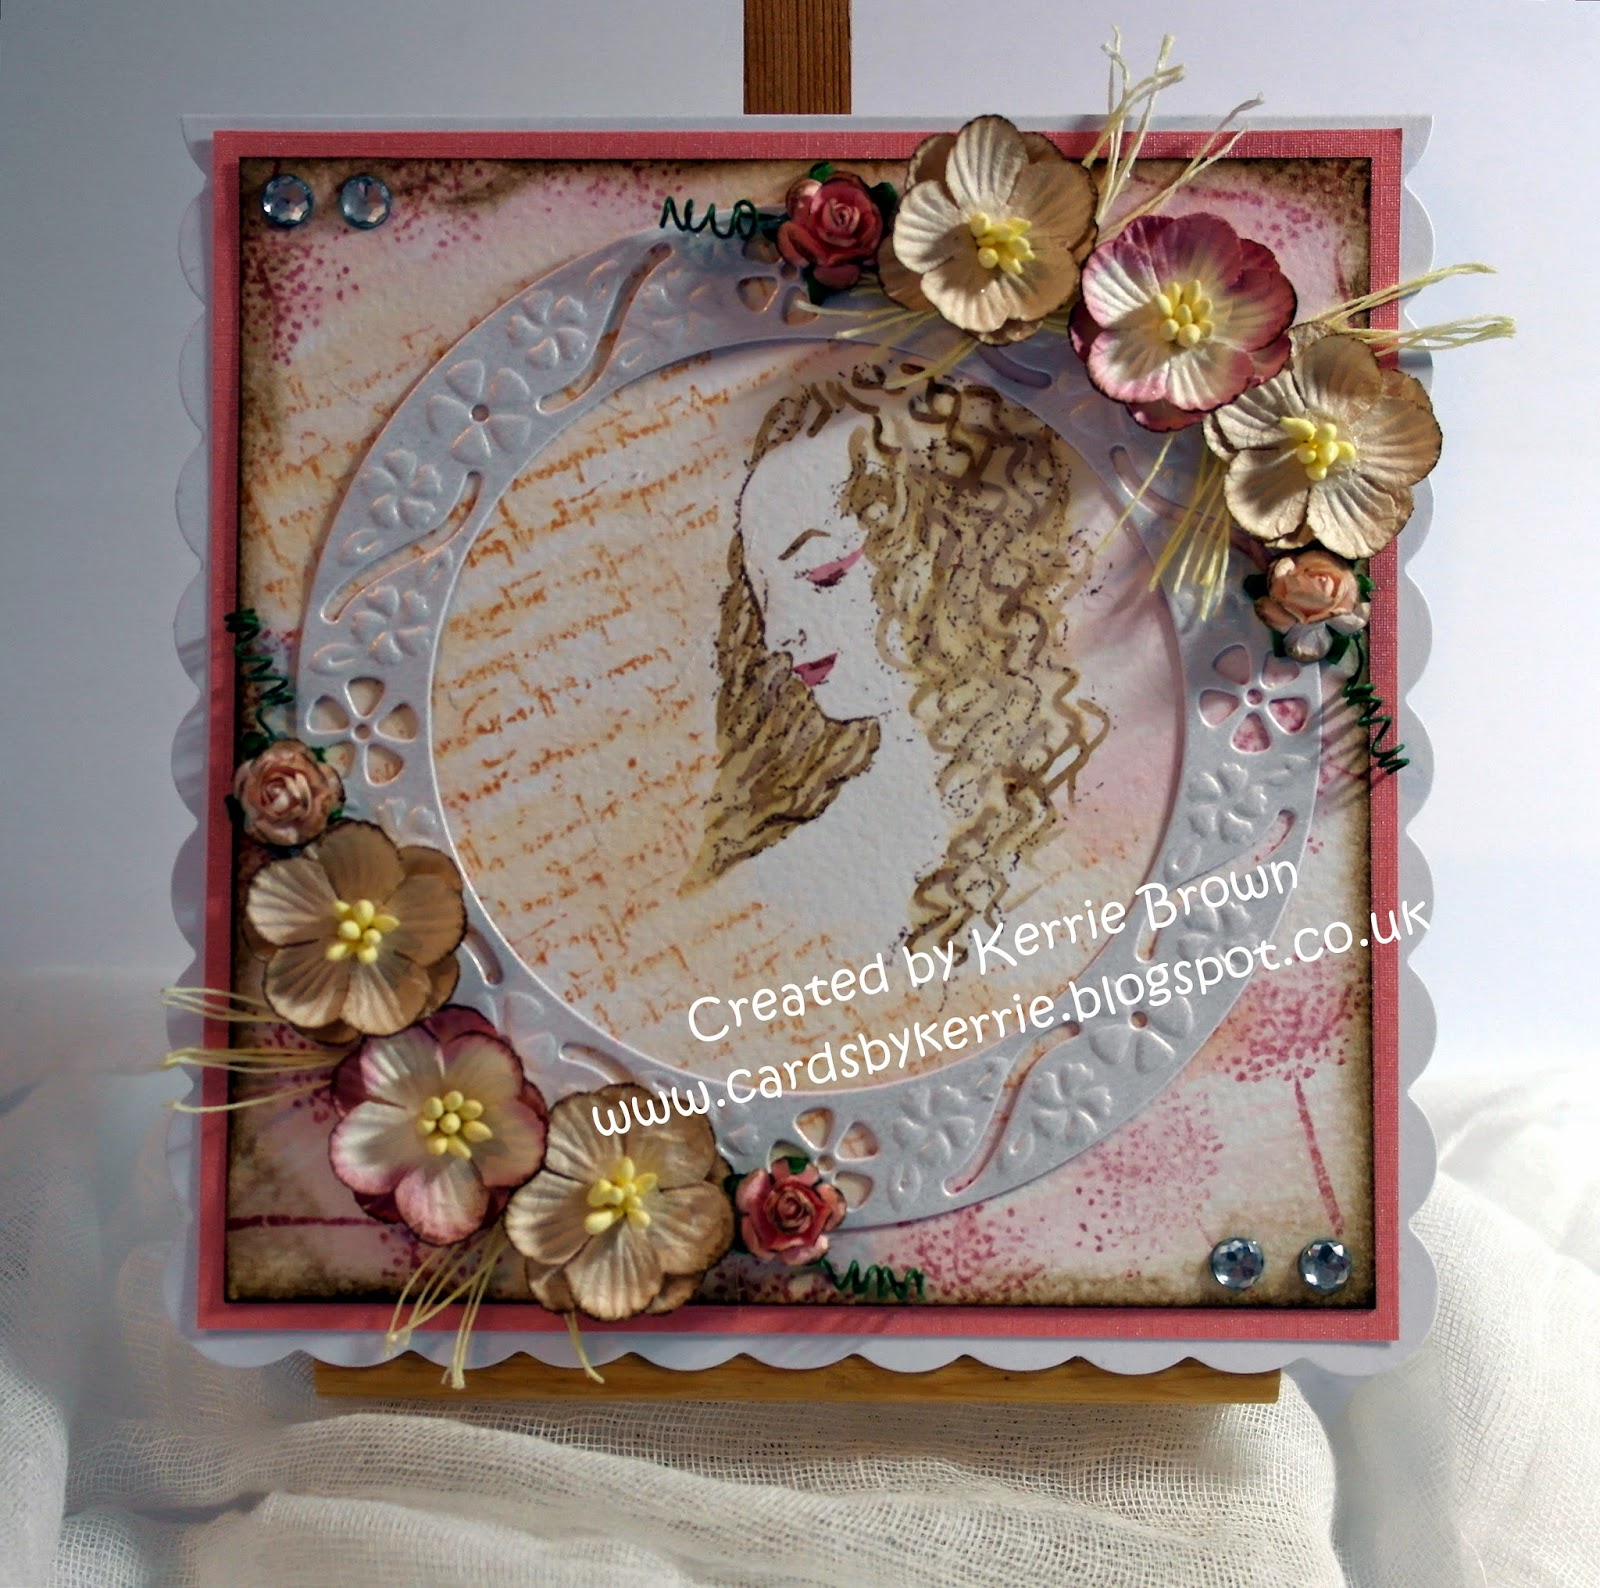
Science of Beauty - Inspired by Da Vinci - Bee Crafty Stamps DT

Hiya and welcome to my Tuesday post for Bee Crafty Stamps

I have been getting messy with some of my Inspired by Da Vinci stamps I brought with my pocket money a few weeks ago - I have a Need! list of  new stamps for Payday im a bit addicted 


For this card I have used....


Distress Ink Pads - Victorian Velvet, Tea Dye & Walnut Stain

White Pearlescent Cardstock

Watercolour Card

Pearlescent Textured Paper

6x6 Scallop Card Blank

Circular Frame Die

Waterbrush & Blending Tool

Paper Flowers - Cherry Blossom & Roses

Gems


I stamped Science of Beauty off-centred onto a trimmed piece of watercolour card using Memento Ink 'Rich Cocoa' then stamped again onto eclipse masking tape and cut around to form a mask which I fixed over the stamped image on the card. I then inked up the Da Vinci Script using Tye Dye distress ink and stamped twice over the edge of the mask to create a script background. I inked up the Cow Parsley and stamped around the edges of the card filling in all the gaps and stamping in various directions. I then removed the mask to reveal no script has been stamped accross her face. I used my waterbrush to wash over the background blending the 2 colours slightly. I tapped the Walnut Stain & Victorian Velvet ink pads onto my glass mat then using my waterbrush to pick up the colour I painted her hair and features of her face. I let this dry out while I prepared my paper flowers, first I trimmed off the stems then inked the edges using Walnut Stain ink and my blending tool. 

I trimmed a piece of pink pearlescent textured paper to a leave a few mm border around the watercoloured picture and fixed this to the cardblank. I inked the edges of the watercolour picture using Walnut Stain ink and my blending tool and attached this to the card front. I die cut the Circlular Frame using white pearlescent cardstock - I attached this over Science of Beauty and most of the script to frame them using a glue gun. I then arranged and fixed the flowers using the glue gun. I used the stems to create foliage in between the flowers. I finished the Card with some gems in the corners.


I hope you like my project and will visit again soon to see gorgeous makes by the Design Team Girls

Krafty Hugs xx


Monday, 16 February 2015

Cute & Cuddly Cupid x


Hiya and welcome to my Blog

Over at the Crafting Musketeer's Challenge Blog today we are sharing with you our makes for the Midway Reminder for our February Challenge - 'Cute'

We have been kindly Sponsered this month by Cuddly Buddly Crafts

I chose to use this Gorgeous Cupid image with some of their papers and one of their sentiments


Image coloured using Copic Markers:

Hair: YR21, Y23, YR31
Skin: E11, E02, E00, E51, E50 Blush E93
Wings: RV10, YR000
Headband & ArrowTip: RV34, RV11
Arrowhead: RV11, RV10
Pants: RV23, RV21. RV11, RV10


Card Recipe:

3 papers kims digi papers pretty mix red - Cuddly Buddly 
Image 'Lilyboo - Little Cupid' - Cuddly Buddly
Sentiment sweet summer sentiments - Cuddly Buddly
Ruby Red pearlescent cardstock - my stash
Doily's - Hobbycraft
Border Punch - Martha Stewart
Paper Flowers - Wild Orchid Crafts
Leaf Flourish Die - Joycrafts

 Head over to the Challenge Blog to see more gorgeous Design Team creations from the Amazing Crafting Musketeer's Team and why not enter we have a brilliant prize £10 to spend at Cuddly Buddly Online Shop x

Thank you for visiting today and I hope you will come back soon

Krafty Hugs 
Kerrie x
Crafting Musketeer

Sunday, 1 February 2015

Co-ordinating Pencil Pot & Planner Page Marker

 Hiya a New Challenge started today over at That Craft Place Blog and the theme this time is 'Anything Goes' what better chance to make a few co-ordinating items for my new Filofax Planning Addiction

Head on over to the Blog to see the amazing Samples by the Amazing Design Team

I have upcycled a Crisps Tin and made a Page Marker and decorated them using 'Portfolio' papers by 'Pink Paislee' I brought from That Craft Place Shop on Facebook


I love this paper pack and the lovely pages of mini journalling cards that I cut from sheets of the paper - the flowers on the page marker are cut using die's and punches.

I drew round the original filofax page marker onto 'Core'dinations' cardstock twice then glued them back to back to strengthen the marker - I marked the holes and punched using my 'Crop-o-Dile'


The Pen Pot started out as a 'Pringles' pot which I have washed out and covered using 'Core'dinations' cardstock in the same colour as the page marker. I wrapped washi tape around the top and the bottom to match the greys in the papers. The two journal cards I cut from the paper pads and rounded the edges using a corner rounder punch. I used some Paper flowers from my stash to finish the pot.


I hope you will enter the Challenge over on the Blog and I hope to see you again soon

Krafty Hugs
Kerrie xx
That Craft Place DT

Saturday, 31 January 2015

Smile! - Sketch Saturday


Hiya and welocme to my Blog so sorry its late in the day Ive been offline all day and didnt realise it hadnt gone live

This is my last post as Guest Designer for Sketch Saturday - its been a lot of fun - thank you to Vannessa for inviting me

Today a new Challenge started over at Sketch Saturday its a pick your Fave Sketch Challenge so you get to look through previous sketches and pick which one to use... all the details can be found over on the Sketch Saturday Blog

This week the Challenge is sponsered by 'Drawn with Character'

I chose to use Sketch #323
and Image 'Holy Shirt' from Slinky<3Tart - I coloured her using Copic Markers


Hair: E37, E35, E31
Skin: E04, E11, E21, E00, E000
Eyeshadow: RV11
Lips: RV11, RV21, RV10
Tshirt & Eyes: YG63, YG61

I chose this sketch as I thought the square remineded me of a polaroid photo so i used my Cameo to cut a polaroid shape


I trimmed the coloured image so that it fitted behind the polaroid shape and matted them both onto golden brown mirror board.
I trimmed a piece of stripey patterned paper to 1/8inch smaller than the 6x6 scalloped cardblank. I used a scallop lace edge border punch along the bottom edge of the paper and then matted onto golden brown mirror board. 
I wrapped a pale pink ribbon around the patterned paper panel and fixed to the card front using 1mm deep foam tape.
I fixed the polaroid to the card front at a jaunty angle using foam tape. I printed the 'Smile!' sentiment using Docrafts Digital Designer, cut it out using a small circle die, matted with mirror board and fixed behind the polaroid shape.
I used some paper flowers from Wild Orchid Crafts and some flat back pearls to finish the card

I hope you will take part in the Sketch Saturday Challenge and will visit my Blog again soon - please follow if you havent already

Krafty Hugs
Kerrie xx
January GDT Sketch Saturday


Saturday, 24 January 2015

Kn(owl)edge - Slinky Tart - for Sketch Saturday

 
Hiya and welcome to my Blog

Today I am showing you a card I made for Sketch Saturday Challenge Blog as Guest Designer

I hope you will visit the BLOG to see the Design Team makes and to see what they all created using the following the sketch below...


The Image I have used is called 'Kn(owl)edge' by SlinkyTart 


I coloured her using Copic Markers:

Hair: E49, E44, E43, 
Skin: E04, E11, E21, E00, E000 Blush: R20
Eyeshadow: C5, C3, C1
Eyes: B39, B37
Lips: E09, E04, R02
Tshirt, Glasses & Diamonds: RV29, R22, R20
Tank Top: B39, B37, N5


Recipe:

8x8 Cardblank (from The Range)
Navy Stripe & Floral Papers - 24.5 x 24.5cm Paper Pad (from Creataonline)
Centura Pearl Cardstock die-cut using Circular Doily Die (from JoyCrafts)
Coloured Image topper cut from - Circle Die from Xcut
Topper edges inked using Spun Sugar Distress Ink
Stretch gift wrap cord wrapped around the Card
Best Wishes sentiment stamp from my Stash
Silver Mirror Board for all Matting
Paper Roses from Wild Orchid Crafts
Pink Gems from my Stash

See you again soon

Hugs
Sketch Saturday GDT-Jan2015

Saturday, 17 January 2015

Saturday Sketch - 'With Love'


Hiya and welcome to my Blog

Today a New Sketch Saturday Challenge begins over on the Challenge Blog and we are being sponsored by.... Bunny Zoe's Crafts and the prize is £10 to spend on their Shop

Go on over and check out the gorgeous Blog and see the Stunning Creations by the Amazing Design Team that I have the honour of being Guest Designer for through January - do please join in the fun all you need to do is follow the Sketch

Here is the Sketch we have for this week...
I coloured my chosen Image using Copic Markers

Copic Markers:

Hair: E37, R35, R31
Skin: E11, E02, E00, E51 Blush: R02
Lips: E04, R02
Eye Makeup & Hair Tie: C3, C1
Shirt: R37, R35, R32, R22, R20, N3

Recipe:

A5 Cardblank, scored and folded from A4 Centura Pearl cardstock - Crafters Companion
All Matting, golden brown Mirror Board - Joycrafts
Background - salmon pink Silky Cardstock - Joycrafts
Embossing - A4 Embossing folder - 'Sue Wilson' Creative Expressions
Floral Layer cut from an Offcut from my fave cardstock pad - Joycrafts
Oval topper and Border cut from Oval Floral Die - Joycrafts
Sentiment Stamp - Bee Crafty Stamps
Paper Cherry Blossoms & Paper Roses - Wild Orchid Crafts
Paper Rose Wires trimmed from the flower using wire cutters and spiralled around a pokey tool
Flat Backed Pearls from my own stash - were white but coloured using R35 Copic Marker

Thank you for visiting my Blog today and I hope you will visit again soon

I am entering this card in the following challenge:

Sassy Studio Designs - It's My Thang' (fave colour combo)

Krafty Hugs
Kerrie xx
Saturday Sketch GDT

TCBOTB Background

Related Posts Plugin for WordPress, Blogger...