Followers

Showing posts with label Challenge Inspiration. Show all posts

Friday, 7 June 2019

Paperbabe Stamps Challenge Picture Inspiration

Hiya and Welcome to my Blog

Today a New Challenge begins over on the Paperbabe Stamps Blog 
and the theme is a Picture Inspiration


You can create anything you like Inspired by the Picture above, the colours, the flowers anything that inspires you and have fun

Paperbabe Stamps Challenges are open to everyone...
As usual you are welcome to combine with other challenges.
Please be sure to link your project below for a chance to win Paperbabe Stamps Gift worth up to £20*
 
Here is my Design Team Project that I created inspired by the flowers & some colours in the picture  


I have created this card using some of the New Face Stamps & Templates that will be available to buy in the Paperbabe Stamps Esty Shop this Saturday 8th June, I chose to use the Portrait Face Stamp with closed eyes, New Freckles Stamp, Long Loose Wave Hair Template along with the Portrait Neck & Shoulders Template... I stamped the face onto watercolour card then traced the templates using a pencil, then I lightly drew a sweetheart neckline top with straps, I also stamped the New Dinky Rose Stamp into her hair... I coloured her using watercolour pencils which I then painted over with a watercolour brush. I created a landscape card using backing papers and mirror board. I layered up with paper doilies. I added mulberry paper roses and fabric flowers using my hot glue gun, I then added some cute little butterfly diecuts and some pearls

I hope you will join in with the Challenge and please do visit the Paperbabe Stamps Blog to see the Beautiful Creations from the Design Team and our Kim


*So, if you use Paperbabe Stamps in your projects you have the chance to win £20 of Paperbabe Stamps, otherwise the prize will be £10.


Please enter your fabulous projects in the linkup! on the Paperbabe Stamps Blog

Thank you for joining in!

Friday, 16 March 2018

Paperbabe Challenge - Anything Goes - Mayleedee Wonderland

Today Begin's another Fortnight's Challenge over at Paperbabe Stamps Team Blog
 
It's one of our favourite ones... Yay!


"Picture Inspiration"


so create anything that you've always wanted to try!
as always please include one paperbabe stamps product, HAVE FUN, and

You are welcome to combine with other challenges provided it's as similar to this as possible.

Paperbabe Stamps Challenges are open to everyone...
As usual you are welcome to combine with other challenges.
Please be sure to link your project below for a chance to win Paperbabe Stamps Gift worth up to £20*.

Here is My Design Team Example for the Challenge

I Created my Card using 'Mayleedee Wonderland' Red Rubber Stamp and the
'Take Time to make Your Soul Happy' Sentiment Red Rubber stamps both from the
Paperbabe Etsy Shop. She coloured Mayleedee using colours to co-ordinate
with the backing papers she choke and then paper pieced her apron
from one of the same backing papers.
 
A Close Up of Mayleedee Wonderland
 
 
So I hope I have inspired you a bit into joining in with the Challenge it really is a lot of fun and the prize is Amazing!!


*So, if you use Paperbabe Stamps in your projects you have the chance to win £20 of Paperbabe Stamps, otherwise the prize will be £10.


Please enter your fabulous projects in the linkup! over on the Paperbabe Stamps Blog
Challenge ends: 30th Mar 2018
Thank you for joining in!

Saturday, 3 February 2018

Paperbabe Challenge - Dots Theme - Dillon Hatter

Hiya and Welcome Back to my Blog

Today I am sharing with you my Design Team Make for this Fortnight's Paperbabe Challenge over on the Team Blog

The Theme this fortnight is Dots, you can interpret this in any way you choose and if you enter over on the Team Blog you could WIN up to £20* of Paperbabe Products

Here is a Picture of what I created for the Challenge using 'Dillon Hatter' as my main focal point


I used a page from an old dictionary with some interesting words on which I fixed down onto the fancy card blank using Decomache Glue, I then inked through a Dotty Template using 'Milled Lavendar' and 'Seedless Preserves' Distress Inks. I love this template because it has many different sizes of Dot so you can really build up details. 

I stamped 'Dillon Hatter' onto plain white cardstock and coloured him using coloured pencils, using colours to match into the spots on the small piece of cardstock I used as a layer over the background. I love how he turned out because 'The Hatter' always wears such outrageous outifts

I stamped some words from the 'Just Because' Sentiment set all separately because you can with Our Kim's clever designing skills so you can make up sentiments to your own needs as the words you want to use  you can't alway find in the normal sentiment sets around on the high street. I spelt out. 'Just BECAUSE you make me smile' and this card I've made to give to my Boyfriend.... We have only been together since early December but he does make me smile every day.

I stamped the 'Curiouser & Curiouser' sentiment from the 'Mayleedee in Wonderland set, just because I love it... I am a huge Alice fan and all the quoted from the book inspire me daily which is when when i changed my name by Deedpoll last month I had to add 'Alyce' in as my middle name 

I added more spots using the Tiny 'Dot Clusters' from the 'Birthday Wishes' set and black ink.

To finish I just had to fussy cut 'Dillon Hatter', matt&layer all the pieces, ink the edges and then piece it all together.


I really like how the card turned out and I hope my Boyfriend will like it too as I am giving it to him today when I go away with him for the Weekend... this is becoming a regular thing now that we stay at each others houses at weekends because I live in Harlow and He lives in Frinton-on-Sea, both are in Essex luckily but still a long old trek to see each other each week... and of course I prefer staying at his as its so close to the Sea. The sea air has always made me feel so much better from when I was really young to now.

Paperbabe Products used in my Project:


*So, if you use Paperbabe Stamps in your projects you have the chance to win £20 of Paperbabe Stamps, otherwise the prize will be £10.

Please enter your fabulous projects in the linkup! on the Team Blog
Challenge ends: 16th Feb 2018
Thank you for joining in!

Thanks You so much for visiting my Blog Today, please do come back again soon as I will be making again more often now that I am finally under the right treatment from the doctors so my enthusiasum for making things is returning!!! Best News Ever!

Krafty Hugs xx

Friday, 19 January 2018

Paperbabe Challenge 'Picture Inspiration' Ultra Violet - Design Team Post

Hiya and welcome to my Blog - It has been a long time since I have posted anything here as I have had a few medical issues but all is good now so I am back and what better way to come back than with a Brilliant Challenge with Paperbabe Stamps

This Fortnight the Challenge is a Picture Inspiration Challenge, you can create anything you like inspired by the pictures below or the colours, any project you like but please do link up on the Paperbabe Stamps Blog for your entry to be entered for a change to Win up to £20* of Paperbabe Products


So, it's time to create anything inspired by the picture... this years colour is ultra violet so 'Our Kim' thought it would be fun to use. Use the picture or colours as inspiration!
As always be sure you use at least one paperbabe stamps product in your creations, and HAVE FUN

Here are some pictures of my Design Team Project for the Challenge


I was inspired to create my Favourite Character from a very famous DC Comics Movie 'The Suicide Squad' - 'Harley Quinn' I just love her so much. I created her using Templates and Stamps all available from the Paperbabe Etsy Shop

Female Portrait Templates 'Head & Torso' & 'Wavy Bunches' and 'Female Face Stamps'. Her untra violet roses background was made using 2 of the roses from the rose border stamp set and the 'Your Sparkle has not gone unnoticed' quote stamp 

watercolours were used for the roses backgroundwhich I built up using an older set from Paperbabe Stamps - the Roses Border set of red rubber stamps


I wanted to show that you dont always need the most expensive pencils available to create a shaded hair look so i used a set of 12 double-ended (so 24 colours) of Crayola Pencils that i got cheaply in my local Supermarket 

I am really happy with how the project turned out

Here is another close up of her pencil coloured hair - I love how using a black pencil under the colours adds some depth and texture to her hair


We would all love to see your entries in the challenge - so go get those craft materials out and ready to play, have fun

The challenge post will go live on Paperbabestamps blog on
Friday 19th Jan at 10am(UK/gmt).

you will have 2 weeks to enter your Beautiful Projects over on the Paperbabe Challenge Blog

 http://paperbabestamps.blogspot.co.uk/


*So, if you use Paperbabe Stamps in your projects you have the chance to win £20 of Paperbabe Stamps, otherwise the prize will be £10.

Please enter your fabulous projects in the linkup!
Challenge ends: 2nd Feb 2018
Thank you for joining in!
Thanks you so much for visiting my Blog today
Krafty Hugs xx

Friday, 22 September 2017

Don't be Afraid to Sparkle - Paperbabe Stamps Challenge - Picture Inspiration

Hiya and Welcome to my Blog

I'm so sorry that I have not been around much of late... I have been quite down but I am slowly starting to pick myself back up 

Today is a Challenge Day over at the Paperbabe Stamps Blog so the Team has been busy making pretties to share with you

The theme of the Challenge is a 'Picture Inspiration'


Paperbabe Stamps Challenges are open to everyone...
As usual you are welcome to combine with other challenges.
Please be sure to link your project below for a chance to win Paperbabe Stamps Gift worth up to £20*
 
You can create any project you like as long as it is inspired by the picture below or the colour scheme etc.

Here's the Picture inspiration...for the challenge 


For my Design Team Project I have picked out the colours from the colour scheme to use in my project. I made a cute little easel card that could be used for any occasion

 
 I picked out a patterned backing paper, complementary coloured cardstock in colours similar to the colour scheme and some silver mirror board for layering.

I created the easel card using a 6x6 cardblank and half of another 6x6 cardblank this time with a scalloped edge. 

The Backing paper I chose to use is A5 and I managed to make this card using only one sheet. First I trimmed a piece to a few mm smaller than the 6x6 cardblank to use on the base of the easel card i then layered using a green cardstock and silver mirror board. For the card front I trimmed a piece of lavendar cardstock to a few mm smaller than the scalloped edge, I then layered with silver mirror board. I trimmed the offcut from the A5 backing paper and attached to the left side of the card front.

I made the easel stopper using offcuts from the cardstock and papers, layer on top of each other and fixed in place using foam tape to created the raised stopper.


for the topper I cut a piece of linen cardstock which I then make an inky painty background using sage and pink inkpads, a waterbrush and an ink blender tool. I then stamped the Large Butterfly solid stamp (from the 'Butterfly Peridae' set) at a jaunty angle using a mauve ink. I added a sparkle trail using wet glue and dazzle dust glitter. I inked the edges using versamark ink which I then dipped into Snowflake Tinsel' embossing powder which i then heated using a heat gun.

I stamped and embossed the Large Butterfly details stamp (also from 'Butterfly Peridae') using versamark and the same embossing powder as before onto vellum. I fussy cut the butterfly, shaped the wings with a bone folder tool to created depth. i attached over the butterfly i had stamped previously using wet glue. The vellum butterfly gives the ellusion of movement to the wings. for the body i used a few little wooden substrate pieces from the 'Mixed Media blank accessories' pack. 


To finish I stamped the 'Don't be Afraid to Sparkle' sentiment stamp and the little antenae using grey ink.

I fixed the finished topper to the card front using foam tape for dimension.

So, it's time to create anything, use the picture or colours as inspiration as always be sure you use at least one paperbabe stamps product in your creations, HAVE FUN, and don't forget to link your project over on the Paperbabe Blog

---------- ~ • ~ ---------- ~ • ~ ---------- ~ • ~ ---------- ~ • ~ ---------- ~ • ~ ----------

*So, if you use Paperbabe Stamps in your projects you have the chance to win £20 of Paperbabe Stamps, otherwise the prize will be £10.

Please enter your fabulous projects on the Paperbabe Stamps Blog
Challenge ends: 
 
Thank you for joining in!


Friday, 14 October 2016

Paperbabe Stamps Challenge - Picture Inspiration

Hiya and Welcome to my Friday Post for Paperbabe Stamps

Each Fortnight on a Friday we have a Gorgeous Challenge - This week though I am sharing with you a Reminder Post to let you know you still have a week to get those entries in over at the Paperbabe Blog

This Fortnight's challenge Theme is a....
'Picture Inspiration' 


So, create anything, use the picture or colours as inspiration
Any Project you like as long as you use the Picture Above to Inspire You in some way!


Paperbabe Stamps Challenges are open to everyone...
As usual you are welcome to combine with other challenges too.

Please be sure to link your project over on the Paperbabe Blog for a chance to win Paperbabe Stamps Gift worth up to £20*.

 
 Here is my Project for the Challenge 

 I made a card using a backing paper with a repeating pattern for the background of her card and the paperpiecing on 'Mayleedees' Dress. Mayleedee is coloured using alcohol markers. The 'Light From Within' sentiment stamp is from the 'Art Quotes' collection
We hope you feel inspired and join in our Challenge
Enjoy a wonderfully creative weekend!

Krafty Hugs
*So, if you use Paperbabe Stamps in your projects you have the chance to win £20 of Paperbabe Stamps, otherwise the prize will be £10.

Friday, 30 September 2016

Paperbabe Stamps Challenge - Anything Goes

Hiya and Welcome to my Friday Post for Paperbabe Stamps

Each Fortnight on a Friday we have a Gorgeous Challenge - This week though I am sharing with you a Reminder Post to let you know you still have a week to get those entries in over at the Paperbabe Blog

This Fortnight's challenge Theme is....
'Anything Goes'

Any Project you like- in any theme

Paperbabe Stamps Challenges are open to everyone...
As usual you are welcome to combine with other challenges too.

Please be sure to link your project over on the Paperbabe Blog for a chance to win Paperbabe Stamps Gift worth up to £20*.

 Here is my Project for the Challenge 

I have made a Christmas Card using the Reindeer Fusions stamp set, the Sparkle Bright sentiment stamp set Knit mixed media template. Some distress inks and her fave alcohol markers 'Copic Sketch'

We hope you feel inspired and join in our Challenge
Enjoy a wonderfully creative weekend!

Krafty Hugs
*So, if you use Paperbabe Stamps in your projects you have the chance to win £20 of Paperbabe Stamps, otherwise the prize will be £10.

Tuesday, 23 August 2016

Hiya this week over at Paperbabe Stamps we are having a 'Picture Inspiration' Challenge.
Your make should be inspired by the picture below. You can use the colours, the shapes or the theme but as long as your make is inspired by the picture then pretty much anything goes


The prize for the challenge is amazing but even more so if you use a Paperbabe Product in your entry project. So please do go and check out the Paperbabe Blog to see all the details - we would love to see all your gorgeous makes


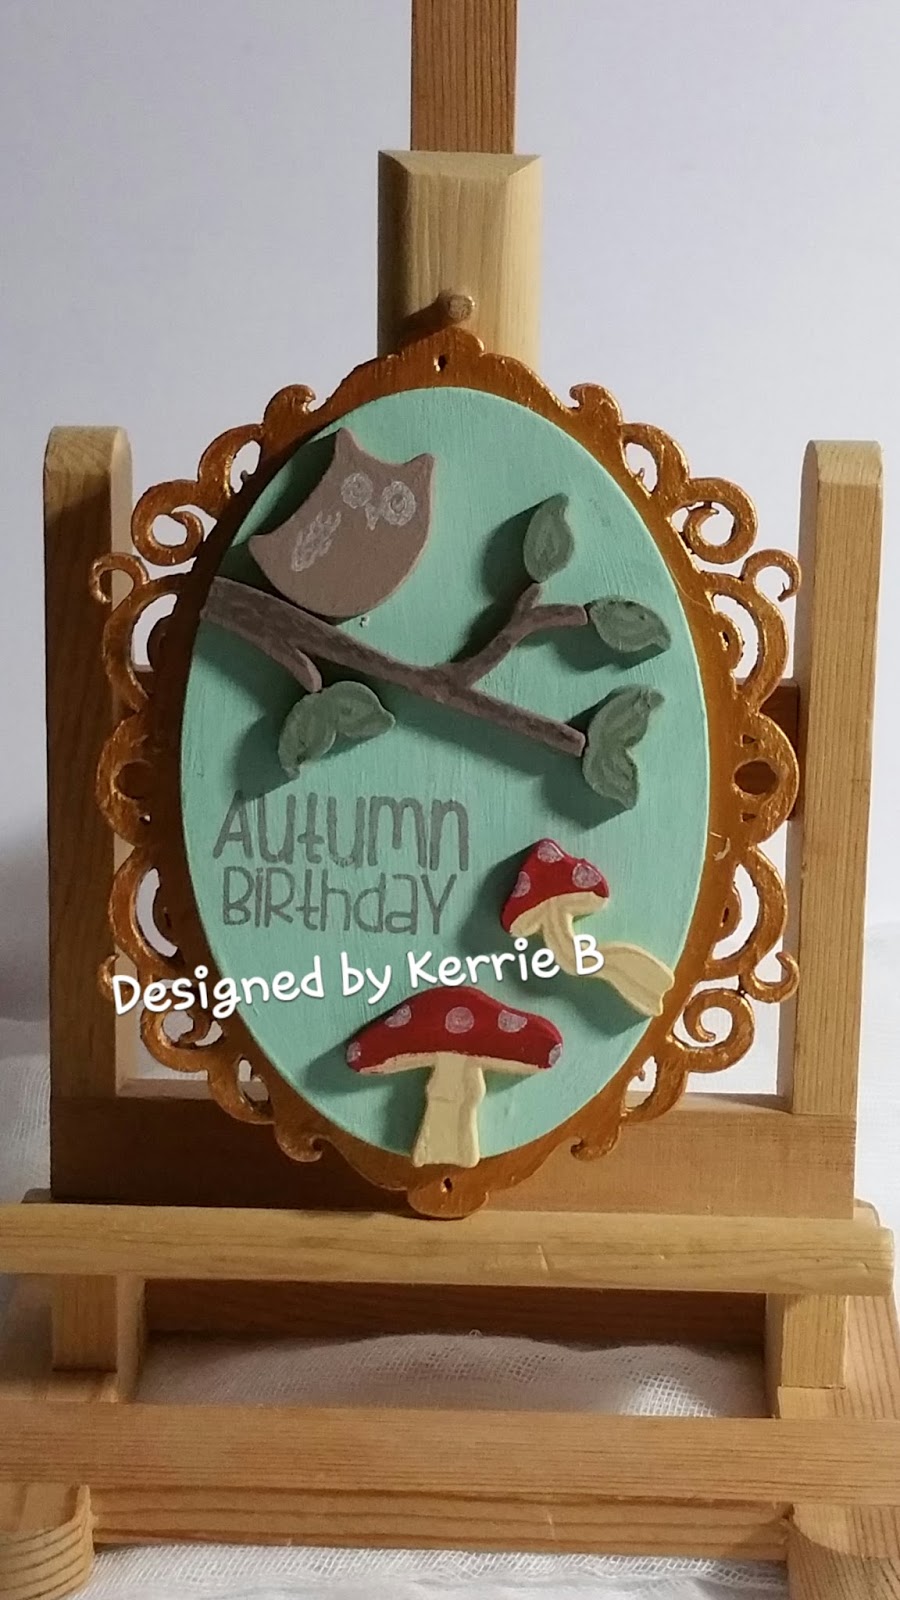
For my make I have used some of the Mixed Media MDF Substrates - the Whimsical Woodland set and the Ornate Frame Oval kit painted first with gesso and then with chalky paints and gold acryllic paint to create her mini hanging plaque.

Which will now be pride of place on my wall in 'Kerrie's Kraft Korner'.


I also stamped the details using a mixture of coloured inks aswell as the matching stamps from the 'Whimsical Woodland Owl' and the 'Whimisical Woodland Butterfly' sets.

Thank you so much for visiting my Blog today please leave a comment so I know you have been and visit again soon for more makes from me 

Krafty Hugs

Monday, 8 August 2016

Christmas in August - with Bee Crafty Stamps

Hiya and Welcome to my Monday Post for Bee Crafty

Now that my Children's Birthday's are done its my tradition to begin my prep for Christmas which includes beginning my shopping plans for their gifts but also the start of my Christmas Cards so today I am sharing one of these new makes for the Festive Season...

I have used some of the Bee Crafty Stamps from the 'Yuletide' Collection


I created a background using the 'Yuletide' - Snowflakes' set along with light and dark blue chalk inks for some of the flakes and then clear embossing ink with a mixture of blue, silver pearl and tinsel white embossing powders which I then heated using a heat toolto create some texture, shine and sparkle.

I then stamped the 'Yuletide' - Believe' large sentiment using blue chalky ink which I sprinkled a little of the tinsel white embossing powder over. I trimmed the seniment, inked the edges by running a clear embossing ink pad accross them, I then dipped into tinsel while embossing powder to add sparkle. I matted the sentiment onto blue cardstock.

To finish my card I matted the background I created onto the same blue cardstock as the sentiment and attached this to a 7x7 card blank. I fixed the Sentiment to the card front using foam tape at a jaunty angle.


Next I repeat stamped the Snowflakes onto offcuts of cardstock in the same inks as before adding ebossing powders including some clear this time for the darker blue. I fussy cut them, used an embossing tool on the reverse of them to create dimention. I then arranged them at the corners of the sentiment layering them up a bit and adding gems to the centres. I added some extra gems to opposite corners of the card to finish


Thank you so much for visiting my Blog today, please do visit again soon for more of my makes x

Krafty Hugs xx
I would love for you to visit xx

Friday, 8 July 2016

Queen of Hearts - for Paperbabe Stamps Challenge

Good Morning!!! and in case I don't see you Good Afternoon, Good Evening & Goodnight!

Today I am sharing with you my Design Team Project for the Challenge over at...

Please do visit the Paperbabe Stamps Blog to see our Kim's Gorgeous Project, links to the other Design Team Members Blogs and to see all the Challenge Rules etc... The Prize as always is amazing but even better if you use a Paperbabe Product on your project

The Theme for this Fortnight is... Anything Goes

I coloured up 'Queen of Hearts' Digital Stamp for my Project - I adore her long hair


I used my Copic Markers they are by far my fave medium ever

For my project I printed a page from Alice in Wonderland to use as the backdrop for the Queen of Hearts, I then chose Black Pearlescent card and a pretty floral backing paper for Matt & Layering behind the book page. I used a die-cut border and some paper flowers to finish off my card. I stamped the 'Dreams Take You'-You Quote red rubber stamp onto an off cut of white card, trimmed and backed it with black card and attached to the bottom of the card front using foam tape


I hope you enjoyed your visit to my Blog today and that I may have inspired you to enter the Paperbabe Stamps Challenge

See You again soon with more makes from me

Krafty Hugs xx

Friday, 29 April 2016

It's a Birthday Challenge - Paperbabe Stamps

Hi, Howdy and Hello to all my lovely readers - big love to you all 

Its a Themed Challenge this week for all of us at Paperbabe Stamps Blog the theme is Birthdays so any new make you have with a Birthday Theme can be added - you dont have to use a Paperbabe Stamp to win but remember that if you do the Prize is Bigger!!!!

Anyway over to my Make for the Challenge

Sticking to the 'Try Something Different' theme I have personally been challenging myself with...I have used only coloured pencils and paper-piecing to colour the Gorgeous 'MayLeeDee' stamp (not a single copic marker) I am actually really please with how she turned out 


I stamped 'MayLeeDee' using pale grey ink so that the lines almost disappear when coloured. I then die cut her using a circle die from my stash and my electric embossing machine (love it no more winding handles) - I then die cut a fancy circle using a pretty die from my stash and some lavender mirror card.


I created the card backdrop using the same paper as 'MayLeeDee's dress and more of the Lavendar mirror board. I made another layer using white card and lavendar mirror board but it felt quite plain so I pulled out my Paperbabe Stamps drawer in my craft desk and found the flowers from the 'Folk Fabrique' set which I then stamped around the edges using 2 shade of purple chalky inkpads. 

I attached all the layers togther onto a 7x7 cardblank using foam tape. I created the sentiment using the decorated Happy and Large happy words from the 'Happy Thoughts' set - I first stamped the decorated word using light grey ink and then over stamped with the large happy word using a purpl chalk ink. 

I finished the card using some lavender flat back gems 

Thank You so much for visiting today - I hope to see your entries over on the Paperbabe Challenge

Krafty Hugs xx

Friday, 15 April 2016

Paper-Piecing -Cut Bunny - Paperbabe Stamps

Hiya and Welcome to my Blog today - Other the last few days in Harlow we have been enjoying some lovely Sunshine which is a sign that spring is here! - Today though we have Rain and a lot of it but that's ok because 'April Showers, bring May Flowers' so It's all good!

Today over at Paperbabe Stamps Blog is the start of a New Challenge
the theme is Anything Goes 

We would love to see your gorgeous Makes so please do enter - the prize is Amazing

For my Design Team example I chose to use a sometimes forgotten (by me at least) technique
'Paper-Piecing' 

I love this Techinique as you can use up all your off-cuts when using stamps


I picked a pretty Floral Backing Paper which I teamed up with another piece of Backing Paper in a co-ordinating colourway. I then created a layered up background for the 6x6 cardfront adding in some Silver Mirror Board

For the Bunny I used the 'DesignA Adorimals' set and the 'Kawaii Faces' set. I stamped her first onto a pre trimmed pice of stamping cardstock and then stamped her again in separate pieces onto the offcut of Floral backing paper saved from when creating the cardfront. I cut out all the patterned paper pieces using scissors and a craft knife.

I decided to stamp the 'Ribbed Background' stamp but to keep the bunny clear of the stamped texture I stamped the bunny pieces again onto post-it notes and layered them over the stamped image to mask her. I then inked up the Ribbed Background using pink ink and stamped it over the whole image, when I removed the post-it notes the Bunny was still white. I then fixed the patterened paper pieces onto the Bunny using glue-stick. I then coloured in her features

I layered up this Topper using Silver Mirror Board to tie in with the Background and fixed this topper to the cardfront using foam tape.

I stamped some Sentiments from the 'DesignA Knit' set (on Special Offer 50% off) onto offcut pieces of stamping card then cut them using a paper trimmer and layered them up using offcuts of the Floral Paper from before and Silver Mirror Board. I fixed them to the Cardfront using my Glue Gun.

I finished off the Card using rose gold paperclips and mini flat back gems.

I have made a similar card using the Paper-Piecing Technique before and I wanted to show you this one again to show how different backing papers can change the Bunny completely


Thank You so much for visiting my Blog today - I hope I have inspired you to give Paper-Piecing a try. Do please visit the Paperbabe Stamps Blog to see the Gorgeous Projects by the Amazing Design Team (there is a link to their own Blogs under each picture)

Krafty Hugs xx

Friday, 8 April 2016

Paperbabe Challenge - Midway Reminder - Sketch

Hiya and Welcome to my Blog

I have been ill over the last week with a chest infection so Ive been quite behind with all my work - so I am posting a Midway Reminder today for the Paperbabe Stamps latest Challenge 

It is a Sketch Challenge - the Sketch below is our Guideline for this Challenge - I followed the Sketch pretty much exactly to show how you could use the Sketch to create your entry for the challenge - you could also swap the flowers for any topper/image that you chose - you could also turn or flip the Sketch to fit how you would like to work


I really love Sketch Challenges they are brilliant as an inspiration if you have a dip in your crafty mojo - or for beginners who are just learning how to layout and balance their cardmaking/crafty projects

Here is my example for the Challenge


I started with some simple matt and layering using some pretty burgundy backing paper from my stash and a linen effect 6x6 card blank i rounded all the corners. I then trimmed a piece of stamping card and chose a few of my Paperbabe Stamps to create the flowers, sentiment and the spray effect background

The Paperbabe Stamps I chose to use are...

Paint Spray - from 'Spritz & Speckles' clear stamp set
Group Spots - from 'Birthday Wishes' clear stamp set
Single Spot (freckle) from 'Female Mini Face' clear stamp set
Roses & Leaves (cut up separately) from 'Rose Border' red rubber stamp set
You Are Loved sentiment 'You Quote - You Are Loved' red rubber stamp

I stamped the You Are Loved sentiment onto a strip of white card which I then cut into a Banner which I then doodled a faux stitching border. I matted the banner onto burgundy mirror board

I stamped the Paint Spray stamp twice using grey ink onto the stamping card I had prepped earlier. I then stamped the Spots stamps using the grey ink.

I fixed the banner to the card using 1mm foam tape to raise it up and add dimention.

I stamped 2 sizes of the Roses using black ink, coloured them using my Copic Markers and fussy cut them out. I fussy cut out a smaller layer from one of the larger rose wich I attached on top of the other one with glue gun to create a decoupage layer. I layered up the leaves and roses to the card and then fixed the card toppper I have created to the card front using foam tape to raise it up from the rest of the layers.

Thank You so much for visiting my Blog today I hope I have inspired you to enter the Challenge you have 1 week to get your entries in over on the Paperbabe Stamps blog 

Krafty Hugs xx

TCBOTB Background

Related Posts Plugin for WordPress, Blogger...