Today is New Release Day over at The Stamping Chef and as DT I had the opportunity to create with the Digi to show you today
You can get your Digi Here for a discounted price
I printed 'A Bootyful Night' onto super smooth card stock and coloured her with my Copic Markers
I have used papers and elements from a Digi Kit from Daisy Trail using Serif Craft artist - I printed them onto super smooth paper and cut them out to use on my card - i chose to use a very spooky Halloween theme for the Digi and the design of my card xxx
Please visit The Stamping Chef BLOG to see the many other Examples by the Amazing Design Team each are very unique and beautiful xx
--------------------------------------------
Also today I would like to remind you of the Challenge over at TSC Recipes Group on Facebook
'Scarlet Hunger' the Challenge is ending on Monday so there is still time to get those entries in. The Digi is available from The Stamping Chef online shop Here
Here is my Example using the Digi which is specially designed for the Challenge
I printed the Digi onto super smooth card stock and then coloured with my Copic Markers
I have used and embossing folder and centura pear cardstock for the backing. I have used Black Mirror Board for the matt&layering. I chose to some of my Creata Dies and a Cheery Lynn Die to create the embellishments on the card. The flowers are cut from a smaller flower punch.
thank you for stopping by today I hope you visit again soon xx
Luv Kerrie DT
Friday, 9 August 2013
Tuesday, 6 August 2013
Creata Challenge #8 Circles xx
A new Challenge has begun and you have 2 weeks to make a creata that will wow us over at the Creata Challenge Blog
The theme this time is Circles you can use theme however you like but for your entry to count you do need at least 1 CREATA PRODUCT you will need to link up a link to the post on you blog or to a photo album on Facebook or similar but needs to be a public picture so all can see it.
Here is my example for the Challenge
Creata Products Used
Special Easel Card Blank
Circle Die
Butterfly Circle Die
Kraft Card Stock
Love Themed Stickers
Mirror Board
Digi by Sherri Baldy Stamps colour with Copic Markers xx
We would all love to see your entries over at the Challenge Blog xx
Luv & Kraft Hugs
Kerrie DT xx
The theme this time is Circles you can use theme however you like but for your entry to count you do need at least 1 CREATA PRODUCT you will need to link up a link to the post on you blog or to a photo album on Facebook or similar but needs to be a public picture so all can see it.
Here is my example for the Challenge
Creata Products Used
Special Easel Card Blank
Circle Die
Butterfly Circle Die
Kraft Card Stock
Love Themed Stickers
Mirror Board
Digi by Sherri Baldy Stamps colour with Copic Markers xx
We would all love to see your entries over at the Challenge Blog xx
Luv & Kraft Hugs
Kerrie DT xx
Monday, 5 August 2013
Besties of OZ - Month Long Cash Challenge Ends Soon xxx
I need to remind everybody that the Besties of Oz Challenge is ending on the 7th of August there is a Cash Prize for the winner xxx
the Challenge is running over at the Besties Challenge Blog please visit to check it out xxx
Here is my Besties of Oz Challenge Entry xx
For all 4 of these cards i have mixed my Besies's Digi's with my Creata Products
I totally love the Besties of Oz and you can find the full collection HERE you can get them individually or in a set xxx
thank you for visiting my Blog today and i hope you will visit again soon and i hope you will be able to enter the Besties of OZ Challenge
Luv & Krafty Hugs
Kerrie DT
xx
the Challenge is running over at the Besties Challenge Blog please visit to check it out xxx
Here is my Besties of Oz Challenge Entry xx
For all 4 of these cards i have mixed my Besies's Digi's with my Creata Products
I totally love the Besties of Oz and you can find the full collection HERE you can get them individually or in a set xxx
thank you for visiting my Blog today and i hope you will visit again soon and i hope you will be able to enter the Besties of OZ Challenge
Luv & Krafty Hugs
Kerrie DT
xx
A few special orders xx
I have been a busy bee this week with DT cards and catching up on Blog commenting etc but i have also had time to make up a few special cards for orders
This first one was a request for a special card to mark my customers 25th Wedding Anniversary the card was for her husband so i thought Black & White Silver was the way to go - I used Serif Craft Artist Program and a Digi Kit i found on Daisy Trail 'From this day forward' its a lovely kit full of classic wedding backgrounds and embellishments - I made the topper using the Digikit (made 3d with a few extra layers) and I found this background paper on there too - I have added Black & Silver mirrorboard layers and the card base is made from Centura Pearl xx
This one was a special request from one of my oldest friends and was a little last minute due to him being caught up with work all week he requested this card Thursday evening and he needed to pick it up Friday evening - ooops - He sent me the Photo of their Wedding Day via Email which i then printed onto matt photo paper - i chose the colurs for backgrounds and flowers from the photo - i coulered the purple roses with a copic marker and added Crystal florist pins similar to the ones in the Brides original bouquet. Ive used lots of layers of pearlescent cardstock and Mirror board in Silver & Purple xx
2 very happy customers and return orders already Yay!!
I do love all aspects of my work weather it is making someones day with a handmade occasions card or creating samples for the DT's i am on - I totally love what i do xx
Thank you for visiting my Blog and i hope to see you again soon
Love Kerrie
xx
This first one was a request for a special card to mark my customers 25th Wedding Anniversary the card was for her husband so i thought Black & White Silver was the way to go - I used Serif Craft Artist Program and a Digi Kit i found on Daisy Trail 'From this day forward' its a lovely kit full of classic wedding backgrounds and embellishments - I made the topper using the Digikit (made 3d with a few extra layers) and I found this background paper on there too - I have added Black & Silver mirrorboard layers and the card base is made from Centura Pearl xx
This one was a special request from one of my oldest friends and was a little last minute due to him being caught up with work all week he requested this card Thursday evening and he needed to pick it up Friday evening - ooops - He sent me the Photo of their Wedding Day via Email which i then printed onto matt photo paper - i chose the colurs for backgrounds and flowers from the photo - i coulered the purple roses with a copic marker and added Crystal florist pins similar to the ones in the Brides original bouquet. Ive used lots of layers of pearlescent cardstock and Mirror board in Silver & Purple xx
2 very happy customers and return orders already Yay!!
I do love all aspects of my work weather it is making someones day with a handmade occasions card or creating samples for the DT's i am on - I totally love what i do xx
Thank you for visiting my Blog and i hope to see you again soon
Love Kerrie
xx
Friday, 2 August 2013
New Release - 'Toadstool Taylor' - The Stamping Chef
I am very very excited to tell you about this new release today 'Toadstool Taylor' is a stunning Digi and she is available to buy today over at 'The Stamping Chef' STORE and this week only you can get her at a special discounted price - you can get Taylor HERE at the new release page x
Please visit 'The Stamping Chef' Blog to see the stunning examples by all the amazing Design Team xx
Here is the card i made using this beautiful image xx
I decided to colour her green and purple for a floral fantasy look i totally love the toadstools in her hair xx
I printed the image onto super smooth cardstock and coloured her with my Copic Markers i chose colours to match the backing paper i had picked to go with her i love the delicate flowers.
Recipe
Floral backing cardstock from 'Crafter's Companion' - 'Toreads' Papercrafting Collection
Dark Green Mirror Board from Creata
Leaf Flourish Dies 'Joy Crafts' from Creata
Large Circle Die 'Joy Crafts' from Creata
Flowers from Wild Orchid Crafts
Scalloped Card Blank 8x8 from Creata
Distress Ink 'Milled Lavender' by Tim Holtz 'Ranger'
Irridescent Glitter from my stash
Here is a close up of 'Taylor' with her Glittered Wings
There is a Facebook Page where you can see more from 'The Stamping Chef' HERE
And a brilliant Facebook Challenge Group where you can enter the fun challenge and win Digi prizes check out the group HERE
Thank you for stopping by to see me today and i would love to see you back here soon
Luv & Krafty Hugs
Kerrie DT
xx
Please visit 'The Stamping Chef' Blog to see the stunning examples by all the amazing Design Team xx
Here is the card i made using this beautiful image xx
I decided to colour her green and purple for a floral fantasy look i totally love the toadstools in her hair xx
I printed the image onto super smooth cardstock and coloured her with my Copic Markers i chose colours to match the backing paper i had picked to go with her i love the delicate flowers.
Recipe
Floral backing cardstock from 'Crafter's Companion' - 'Toreads' Papercrafting Collection
Dark Green Mirror Board from Creata
Leaf Flourish Dies 'Joy Crafts' from Creata
Large Circle Die 'Joy Crafts' from Creata
Flowers from Wild Orchid Crafts
Scalloped Card Blank 8x8 from Creata
Distress Ink 'Milled Lavender' by Tim Holtz 'Ranger'
Irridescent Glitter from my stash
Here is a close up of 'Taylor' with her Glittered Wings
There is a Facebook Page where you can see more from 'The Stamping Chef' HERE
And a brilliant Facebook Challenge Group where you can enter the fun challenge and win Digi prizes check out the group HERE
Thank you for stopping by to see me today and i would love to see you back here soon
Luv & Krafty Hugs
Kerrie DT
xx
Tuesday, 30 July 2013
Paper Rose Tutorial xx
I made a wedding card this morning with 4 handmade paper roses on the front and i was asked how they were made so i thought a blog tutorial would help xx
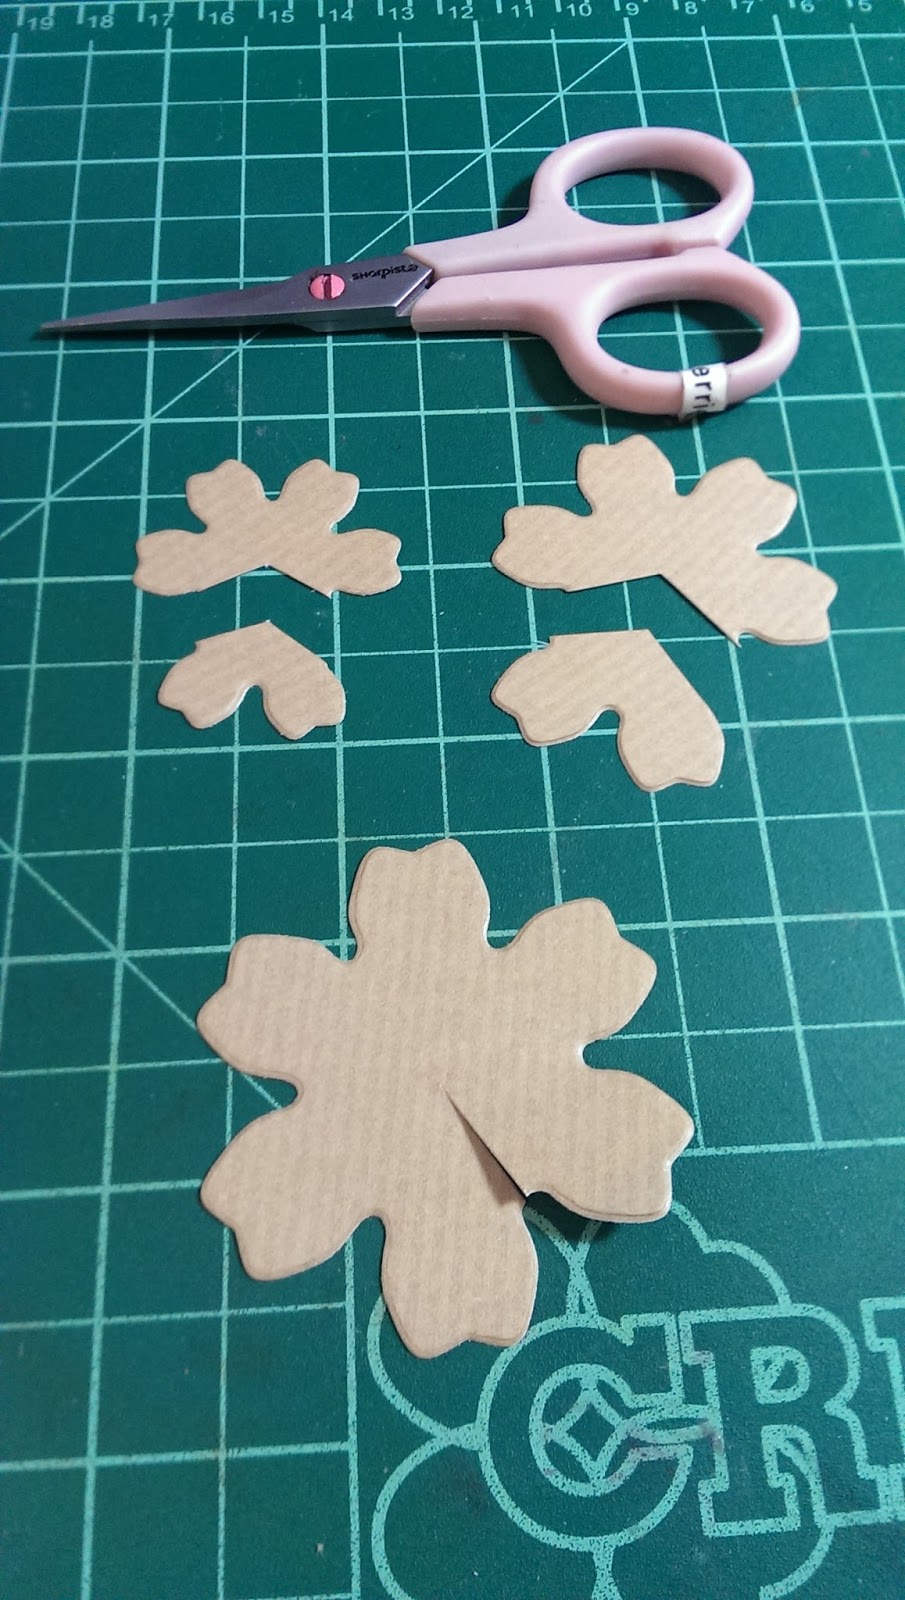
First choose 3 Blossom dies all 1 size larger than each other and die cut them using a Die Cutting Machine.
Next using a small pair of scissors cut the largest one from edge to the middle - then the 2 smaller ones cut out a section as shown, discard one of the tiny sections
Next apply tacky glue to 1 petal on each the 3 larger pieces.
Bend each piece over and stick the end 2 petals together.
Using a pair of gripper tweezers curl over the edges of each petal on all 3 larger pieces.
Apply a blob of tacky glue to the middle of the largest piece.
Attach the next largest piece
and hold in place with your
finger until the glue sticks.

Repeat with the next smallest piece.
Now take the smallest piece from earlier, curl over the edges and sniap away the corner.
Holding the gripper tweezers on the edge.
Curl this piece around the tweezers and apply tacky glue to the edge.
Hold on the end of the tweezers until the glue sticks.
You will have a tight curl that looks like a bud.
Apply a blog of tacky glue to the centre of the paper rose.
Hold the tiny bud in place with your finger until the glue sticks.
This is the finished paper rose.
I hope you have found this Tutorial useful thank you for reading and i hope to see you again soon
Luv & Krafty Hugs
Kerrie xx
Next using a small pair of scissors cut the largest one from edge to the middle - then the 2 smaller ones cut out a section as shown, discard one of the tiny sections
Next apply tacky glue to 1 petal on each the 3 larger pieces.
Bend each piece over and stick the end 2 petals together.
Using a pair of gripper tweezers curl over the edges of each petal on all 3 larger pieces.
Apply a blob of tacky glue to the middle of the largest piece.
Attach the next largest pieceand hold in place with your
finger until the glue sticks.

Repeat with the next smallest piece.
Now take the smallest piece from earlier, curl over the edges and sniap away the corner.
Holding the gripper tweezers on the edge.
Curl this piece around the tweezers and apply tacky glue to the edge.
You will have a tight curl that looks like a bud.Hold the tiny bud in place with your finger until the glue sticks.
This is the finished paper rose.
I hope you have found this Tutorial useful thank you for reading and i hope to see you again soon
Luv & Krafty Hugs
Kerrie xx
New Artistic Inspirations Challenge - Celebrations!!!
Over on the Artistic Inspiration Challenge Blog we have started a new Challenge this one is Celebrations!
This Challenge is Sponsered by Stitchy Bear Digi Shop the prize for the Challenge is a Voucher for there Shop xx
Here is my example for the Challenge using one the Digi's from the Stitchy Bear collection
I printed the Digi onto super smooth cardstock and coloured with my Copic Markers.
Recipe
Scalloped Card Blank by Creata
Backing paper is from the Toreads CDrom by Crafters Companion
Purple Mirror Board is from Creata
Happy Birthday Sentiment stamp by Visible Image
Leaf Punch by Joy Crafts
Flowers Dies by Joy Crafts
Buttons and gems from my stash
we would love for you to visit the Challenge Blog to see the many other examples by the Amazing Team
Luv & Krafty Hugs
Kerrie DT
This Challenge is Sponsered by Stitchy Bear Digi Shop the prize for the Challenge is a Voucher for there Shop xx
Here is my example for the Challenge using one the Digi's from the Stitchy Bear collection
I printed the Digi onto super smooth cardstock and coloured with my Copic Markers.
Recipe
Scalloped Card Blank by Creata
Backing paper is from the Toreads CDrom by Crafters Companion
Purple Mirror Board is from Creata
Happy Birthday Sentiment stamp by Visible Image
Leaf Punch by Joy Crafts
Flowers Dies by Joy Crafts
Buttons and gems from my stash
we would love for you to visit the Challenge Blog to see the many other examples by the Amazing Team
Luv & Krafty Hugs
Kerrie DT
Subscribe to:
Posts (Atom)