Followers

Monday, 5 August 2013

A few special orders xx

I have been a busy bee this week with DT cards and catching up on Blog commenting etc but i have also had time to make up a few special cards for orders


This first one was a request for a special card to mark my customers 25th Wedding Anniversary the card was for her husband so i thought Black & White Silver was the way to go - I used Serif Craft Artist Program and a Digi Kit i found on Daisy Trail 'From this day forward' its a lovely kit full of classic wedding backgrounds and embellishments - I made the topper using the Digikit (made 3d with a few extra layers) and I found this background paper on there too - I have added Black & Silver mirrorboard layers and the card base is made from Centura Pearl xx


This one was a special request from one of my oldest friends and was a little last minute due to him being caught up with work all week he requested this card Thursday evening and he needed to pick it up Friday evening - ooops - He sent me the Photo of their Wedding Day via Email which i then printed onto matt photo paper - i chose the colurs for backgrounds and flowers from the photo - i coulered the purple roses with a copic marker and added Crystal florist pins similar to the ones in the Brides original bouquet. Ive used lots of layers of pearlescent cardstock and Mirror board in Silver & Purple xx

2 very happy customers and return orders already Yay!!

I do love all aspects of my work weather it is making someones day with a handmade occasions card or creating samples for the DT's i am on - I totally love what i do xx

Thank you for visiting my Blog and i hope to see you again soon

Love Kerrie
xx

Friday, 2 August 2013

New Release - 'Toadstool Taylor' - The Stamping Chef

I am very very excited to tell you about this new release today 'Toadstool Taylor' is a stunning Digi and she is available to buy today over at 'The Stamping Chef' STORE and this week only you can get her at a special discounted price - you can get Taylor HERE at the new release page x

Please visit 'The Stamping Chef' Blog to see the stunning examples by all the amazing Design Team xx

Here is the card i made using this beautiful image xx


I decided to colour her green and purple for a floral fantasy look i totally love the toadstools in her hair xx

I printed the image onto super smooth cardstock and coloured her with my Copic Markers i chose colours to match the backing paper i had picked to go with her i love the delicate flowers.

Recipe

Floral backing cardstock from 'Crafter's Companion' - 'Toreads' Papercrafting Collection
Dark Green Mirror Board from Creata
Leaf Flourish Dies 'Joy Crafts' from Creata
Large Circle Die 'Joy Crafts' from Creata
Flowers from Wild Orchid Crafts
Scalloped Card Blank 8x8 from Creata
Distress Ink 'Milled Lavender' by Tim Holtz 'Ranger'
Irridescent Glitter from my stash


Here is a close up of 'Taylor' with her Glittered Wings

There is a Facebook Page where you can see more from 'The Stamping Chef' HERE

And a brilliant Facebook Challenge Group where you can enter the fun challenge and win Digi prizes check out the group HERE

Thank you for stopping by to see me today and i would love to see you back here soon

Luv & Krafty Hugs
Kerrie DT
xx


Tuesday, 30 July 2013

Paper Rose Tutorial xx

I made a wedding card this morning with 4 handmade paper roses on the front and i was asked how they were made so i thought a blog tutorial would help xx

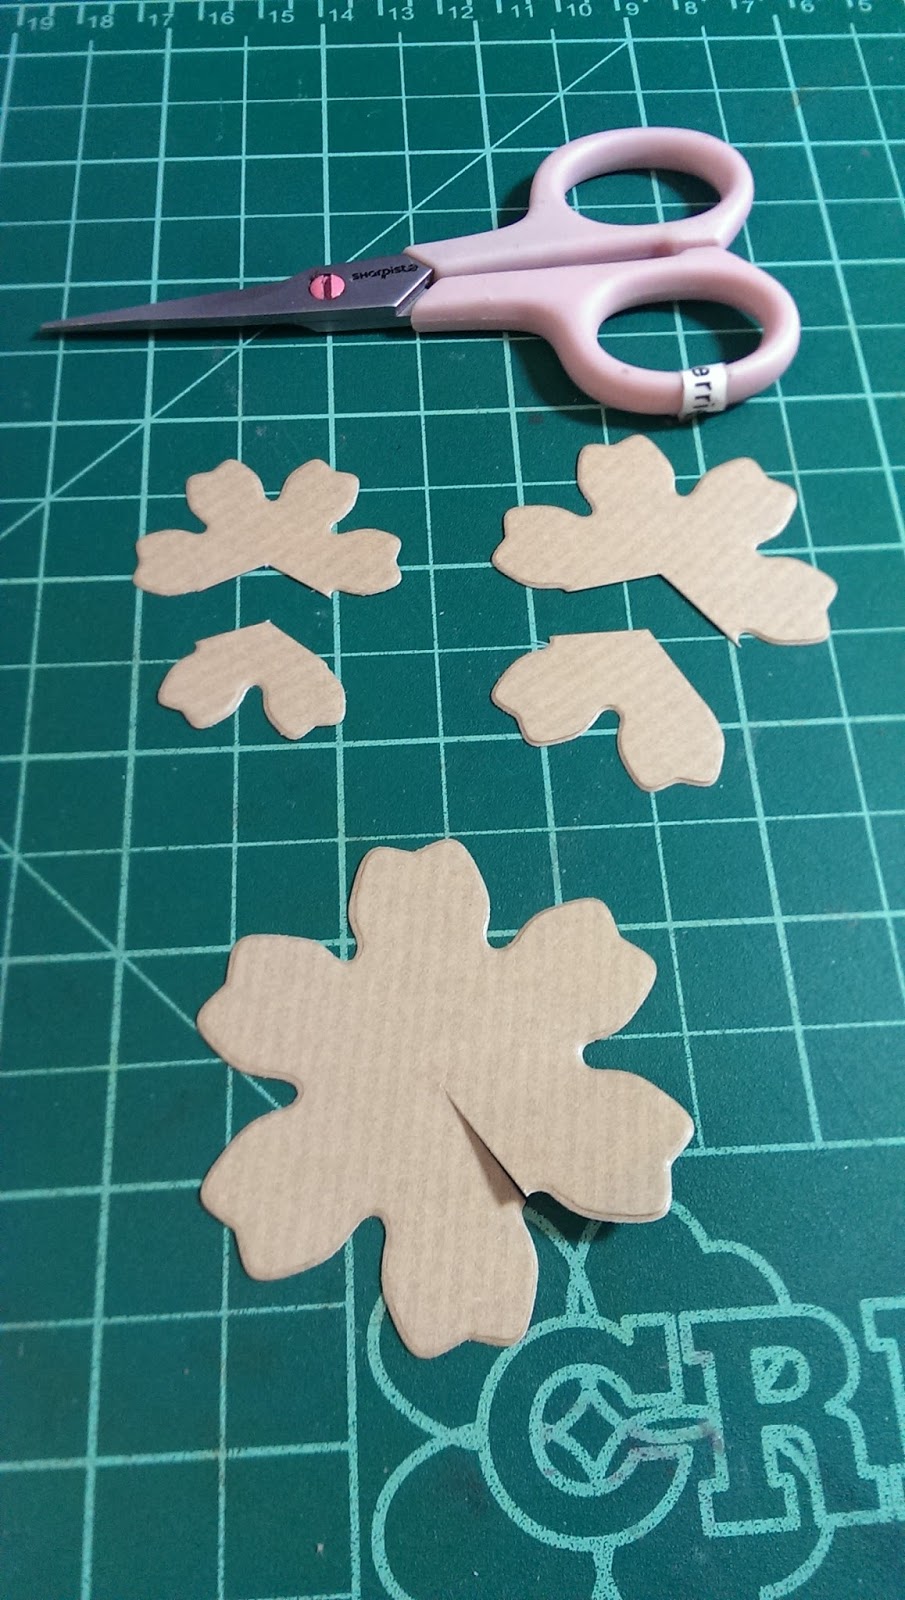
 First choose 3 Blossom dies all 1 size larger than each other and die cut them using a Die Cutting Machine.

 Next using a small pair of scissors cut the largest one from edge to the middle - then the 2 smaller ones cut out a section as shown, discard one of the tiny sections


 Next apply tacky glue to 1 petal on each the 3 larger pieces.

 Bend each piece over and stick the end 2 petals together.
Using a pair of gripper tweezers curl over the edges of each petal on all 3 larger pieces.
Apply a blob of tacky glue to the middle of the largest piece.
Attach the next largest piece
and hold in place with your
finger until the glue sticks.


Repeat with the next smallest piece.


Now take the smallest piece from earlier, curl over the edges and sniap away the corner.


 Holding the gripper tweezers on the edge.
 Curl this piece around the tweezers and apply tacky glue to the edge.
 Hold on the end of the tweezers until the glue sticks.
You will have a tight curl that looks like a bud.
Apply a blog of tacky glue to the centre of the paper rose.


Hold the tiny bud in place with your finger until the glue sticks.


This is the finished paper rose.


I hope you have found this Tutorial useful thank you for reading and i hope to see you again soon

Luv & Krafty Hugs
Kerrie xx

New Artistic Inspirations Challenge - Celebrations!!!

Over on the Artistic Inspiration Challenge Blog we have started a new Challenge this one is Celebrations!

This Challenge is Sponsered by Stitchy Bear Digi Shop the prize for the Challenge is a Voucher for there Shop xx

Here is my example for the Challenge using one the Digi's from the Stitchy Bear collection


I printed the Digi onto super smooth cardstock and coloured with my Copic Markers.

Recipe

Scalloped Card Blank by Creata
Backing paper is from the Toreads CDrom by Crafters Companion
Purple Mirror Board is from Creata
Happy Birthday Sentiment stamp by Visible Image
Leaf Punch by Joy Crafts
Flowers Dies by Joy Crafts
Buttons and gems from my stash

we would love for you to visit the Challenge Blog to see the many other examples by the Amazing Team

Luv & Krafty Hugs
Kerrie DT

Monday, 29 July 2013

UK Besties - Blog Hop - Bring Me Sunshine!

Today we have a new challenge and blog hop launching today at MY BESTIES UK and this time its in the theme of BRING ME SUNSHINE - the DT are showing their inspirational projects on their own blogs as part of the blog hop that is also running in conjunction with this challenge. We hope you will hop along with us as well as linking up your sunshine card.


Here is my Example for The Blog Hop and Challenge


I used one of the Messy Bessy Digi's you can buy her Here

The Digi is printed onto Super Smooth cardstock and coloured with Copic markers choosing colours to match the Checked Background cardstock which is matt&layered with Gold mirror board and fixed to a cardblank. Another piece of the background cardstock has been cut into a strip which is half inch shorter than the backing then matt&layered with the bold mirror board and fixed accross the bottom section of the card. The flower are cut from co-ordinating papers using flower dies from Creata as are the leaves, sun and clouds. I have handwritten the greeting 'you are my.....sunshine' using a black fineline marker. Ive added gems to her hair, gold glitter glue to the flowers and 3 larger gems in the top left hand corner.

Luv & Krafty Hugs
Kerrie DT xx


CHALLENGE
You can still take part in the challenge theme and be eligible for our normal blog challenge candy too - we look forward to seeing your creations.

Challenge Prizes!
The Winner - You will receive 3 Besties digi stamps of your choice
1st runner up - You will receive 2 Besties digi stamps of your choice
2nd runner up  - You will receive 1 Bestie digi stamp of your choice

BLOG HOP
If you are hopping with us then please follow the hop links below. We have 5 digis on offer as a prize.
The DT have been working hard on their projects and each one has created their own unique style of SUNSHINE card which they are showing on their own blogs. You will need to hop to each blog to see their creations then leave them a comment before leaving. hop on over to each person in the line up, leaving comments as you go, to be eligible for the prize.

Blog hop Line up:

Gill (DT co-ordinator) - http://creationsbygillm.blogspot.com 
Kerrie - http://cardsbykerrie.blogspot.co.uk/
Tina -  http://tinas-cards.blogspot.co.uk
Sharon  - http://sharonscreativeramblings.blogspot.co.uk/
Caroline -http://carolinesspicecrafty-bits.blogspot.co.uk
Carley - http://carleyduffcreations.blogspot.co.uk
Abbie - http://kraftygirlcreations.blogspot.co.uk/

Thanks for stopping by today we look forward to seeing what you create for the challenge,  using the Sunshine theme, then link up your entry below and dont forget to stop by the Besties UK blog in  3 days time for the blog hop winner to be announced.

Sunday, 28 July 2013

Surf's Up !!!!!

There is a very very wicked group on Facebook called 'TSC Recipes' where they run weekly challenges with a Digi provided each week for use in the challenge xx the winning entrant then gets to choose a Digi of their choice from the Digi Store - Here.

The Challenge Image is offered for Free on the first day of the Challenge and then at a discounted price for the rest of the week there is still time to entere so you can order the Digi - Here ... this weeks challenge ends tomorrow morning - then the new challenge will begin at 12noon UK time So go visit the group and check out the rules for this very fun Challenge xxx

Here is my Example for this weeks Challenge called 'Surf'sUp!'


I printed the Image onto super smooth cardstock and coloured with my Copic Markers and Promarkers - Skin E00, E02, E11, E31, Hair E37, Surf Board W1, W2, Leaves YG61, YG63, YG67, Swim Costume,Flower and Makeup, Promarkers, Carmine and Wild Cranberry. The Dies are all from Creata, which i cut from Creata mirror board and I chose (creata) Flower Forming flowers to match the one on the surf board - The Background is hammered cardstock which i have inked using Tim Holtz distress inks in ... Broken China, Faded Jeans and Peeled Paint. I then Matt&Layered this topper with Dark Pink mirror board then attached to a cardblank.

I hope you liked my Post today

Luv & Krafty Hugs
Kerrie DT

New Baby Card Order

This Baby Card is proving to be quite popular and i quite like making it 


I measured linen cardstock to 11inchx5.5inch and scored in half on the 5.5 mark to make a 5.5sqaure blank then to make into a twisted easel i scored diagonally from score line to the corner on one of the halfs - i then attached another piece of linen cardstock measured to 5.5x5.5

I printed a gingham backing paper from my Swalk Papercrafting CDrom2 (from Crafters Companion) this i then trimmed to 4mm smaller than the cardblank and matt&layered with silver mirror board attached this to the front of the card blank and then repeated for the inside panel too.

using two small scrap pieces of pink spotty backing paper i fixed 1 to each the front and the inside of the card. I stamped the Baby Image (Swalk stamp) onto super smooth cardstock and coloured with copic markers and matt&layered with pearlescent pink cardstock, I used a circle die with silver mirror board which i cut in half and tucked behind the topper. The Baby Name, Birth details and inisde wording were typed and printed from my Docrafts Digital Designer software x

I then added some baby theme embellishments xx

TCBOTB Background

Related Posts Plugin for WordPress, Blogger...